

Homemade Low-Sodium Chili Oil Recipe
Want a flavorful chili oil without the high sodium content? Store-bought options can contain up to 920 mg of sodium per serving, but making it at home offers a healthier alternative with as little as 2 mg per serving. Plus, you control the ingredients, avoiding preservatives, MSG, and low-quality oils.
Here’s the key to making your own chili oil:
- Use high-quality oils like extra virgin olive oil or avocado oil.
- Infuse with spices like Sichuan peppercorns, star anise, cinnamon, and smoked paprika for depth.
- Avoid fresh garlic or moisture-rich ingredients for long-term storage safety.
Pro Tip: Heat oil to around 300°F for infusion, then cool it to 200°F before adding chili flakes for maximum flavor. Store in the fridge and enjoy for up to six months. Perfect for noodles, veggies, or stir-fries - without the sodium overload.
How To Make Proper Chili Oil (Chinese Style)
sbb-itb-4066b8e
Ingredients and Their Purpose
The backbone of any great chili oil lies in its ingredients. Each one plays a unique role in building layers of flavor, heat, and aroma, resulting in a low-sodium condiment that’s as versatile as it is delicious. Let’s take a closer look at what you’ll need and why each element matters.
Choosing the Right Extra Virgin Olive Oil
The oil you pick sets the stage for your chili oil. Extra virgin olive oil (EVOO) isn’t just a carrier for heat - it brings its own flavor and health perks. Packed with about 75% oleic acid, a monounsaturated fat known to help reduce inflammation, and over 30 antioxidant-rich phenolic compounds, EVOO is both flavorful and functional.
When selecting EVOO, match its profile to the heat level you want. Robust, peppery oils complement fiery chilies like arbol or bird’s eye, while milder, buttery oils pair better with gentler options like Calabrian or Ancho peppers. Brands like Big Horn Olive Oil offer cold-pressed, Ultra Premium EVOO - exactly the kind of quality that makes all the difference in homemade condiments.
For the best results, look for oils in dark glass bottles to protect against light degradation and check the harvest date (ideally within 18 months). Single-origin oils are another good choice, ensuring consistent flavor and freshness while minimizing the risk of rancidity.
Spices That Bring Heat and Complexity
The spice blend is where your chili oil’s personality comes to life. Coarsely ground Chinese red pepper flakes are a favorite - they’re vibrant in color and deliver a balanced heat compared to Italian crushed red pepper. Want more intensity? Add a pinch of cayenne pepper.
For an authentic twist, toss in Sichuan peppercorns. These bring a unique mouth-numbing sensation (ma) that pairs beautifully with the heat (la) from the chilies. Star anise adds a warm, sweet licorice note, while cinnamon sticks contribute a subtle woody depth. Other spices like bay leaves, cardamom, and coriander seeds layer in citrusy and earthy aromas, creating a rich, multidimensional flavor profile. And don’t forget garlic and ginger - these aromatics form a savory base, though they’re usually strained out for better shelf stability.
"Sichuan peppercorns are a fragrant mouth numbing peppercorn used in Asian dishes." - Angie, Founder, Siriusly Hungry
For the best infusion, heat your oil to 300°F (148°C) to activate the aromatics, then cool it to 200°F (93°C) before adding chili flakes. This technique extracts maximum flavor without damaging the oil’s beneficial properties.
Enhancing Flavor Without Adding Salt
Crafting a flavorful chili oil without sodium calls for a bit of creativity. Toasted sesame seeds add a nutty aroma - just toast them over medium heat for 2–3 minutes until lightly browned. Smoked paprika brings a smoky depth, while citrus zest (lemon, lime, or mandarin) brightens the mix. Just make sure to pat the zest dry before adding it to hot oil to avoid splattering.
Fresh herbs like rosemary, thyme, or oregano can shape the oil’s profile, whether you’re aiming for Mediterranean, Mexican, or Asian-inspired flavors. For a tangy kick, a splash of Chinese black vinegar adds a complex, acidic balance.
"The method works so well because it flash-extracts all the oil-soluble flavors and aromas of the ingredients without burning them off." - Frontier Co-op
Safety Tip: Avoid leaving fresh garlic or moisture-rich ingredients in the oil for long-term storage at room temperature; this can lead to botulism. Stick to dried ingredients for shelf stability. If you use fresh aromatics, refrigerate the oil immediately and consume it within one week.
With these carefully selected ingredients, you’re ready to create a chili oil that’s both flavorful and low in sodium, perfect for adding a kick to your favorite dishes.
How to Make Low-Sodium Chili Oil
Step-by-Step Guide to Making Low-Sodium Chili Oil at Home
Making low-sodium chili oil at home is all about balancing the right ingredients with careful temperature control. Follow these steps to create a flavorful, aromatic oil.
Tools and Ingredients You'll Need
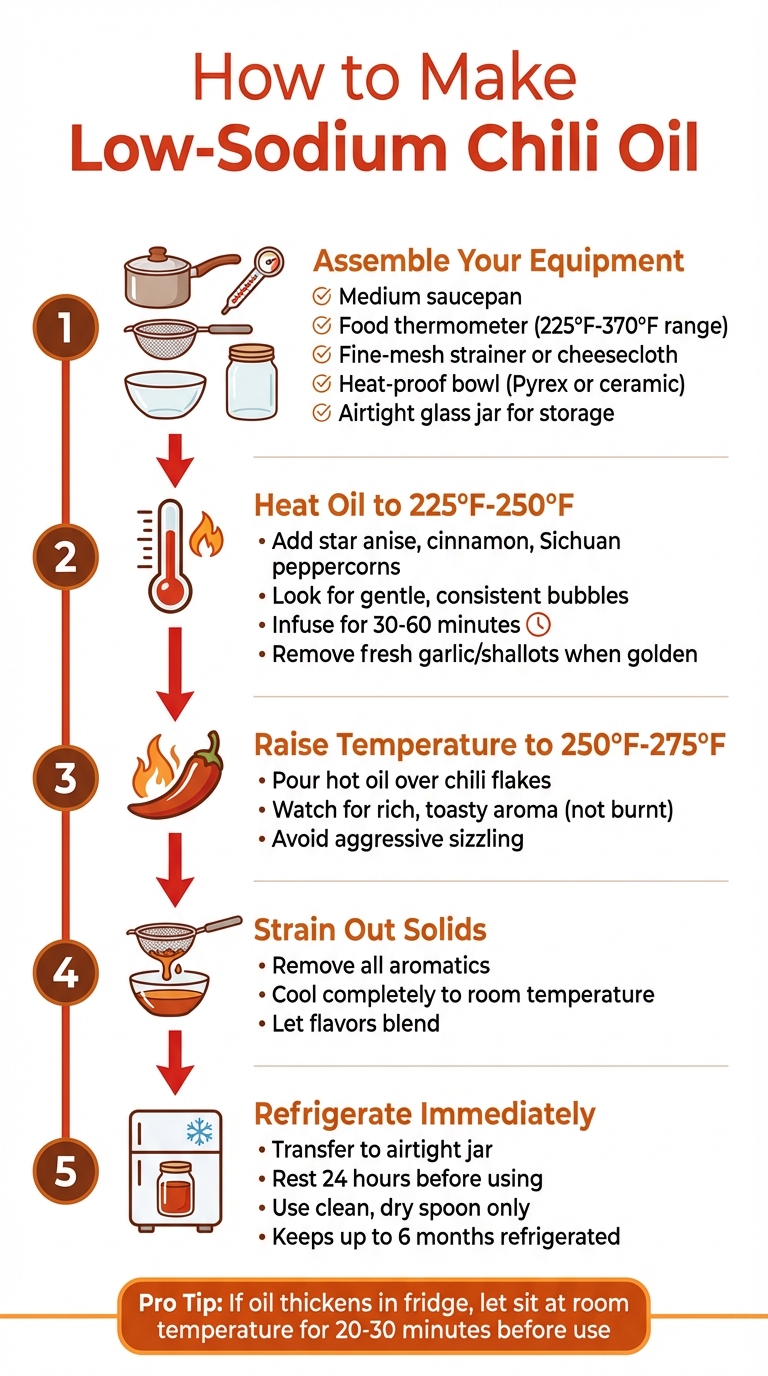
Before you start, gather the right tools to make the process smooth and safe. Here's what you'll need:
- A medium saucepan for heating the oil.
- A high-temperature food thermometer (instant-read or candy thermometer) to keep track of oil temperatures between 225°F and 370°F.
- A fine-mesh strainer or cheesecloth for straining out solids.
- A heat-proof bowl, like tempered glass (Pyrex) or ceramic, to handle the hot oil.
- A clean, airtight glass jar, such as a mason jar, for storing the finished oil.
When it comes to the oil, quality is key. An Ultra Premium Extra Virgin Olive Oil from Big Horn Olive Oil is recommended for its freshness and rich flavor, which will elevate your chili oil to the next level.
Heating and Infusing the Oil
Begin by heating your oil over medium-low heat in your saucepan. To infuse the aromatics - such as star anise, cinnamon, and Sichuan peppercorns - keep the oil between 225°F and 250°F. Once the aromatics are added, raise the temperature slightly to 250°F–275°F before incorporating the chili flakes.
Keep an eye on the oil. You’re looking for gentle, consistent bubbles. If the oil starts sizzling aggressively, lower the heat immediately to avoid burning your ingredients.
"The crucial thing is to make sure your oil is at the right temperature: light, faint wisp of almost-invisible smoke and baby bubbles escaping from your chopstick when dipped in that heated oil are tell-tale signs it's hot enough to toast the crushed chili flakes and spices but not hot enough to scorch and burn them." - June Xie, Author
Let the aromatics infuse for 30 minutes to an hour to draw out their full flavor. If you're using fresh garlic or shallots, remove them once they turn golden to prevent any bitter notes. After the infusion is complete, strain out the aromatics. When pouring the hot oil over the chili flakes, the aroma should be rich and toasty - not burnt.
Cooling and Storing Your Chili Oil
Once the infusion process is done, let the chili oil cool completely to room temperature before transferring it to your airtight jar. This resting period helps the flavors blend beautifully. Refrigerate the oil right away to maintain its freshness and prevent any safety concerns, such as botulism.
For the best flavor, allow the oil to sit for at least 24 hours before using it. This gives the spices time to fully develop. Always use a clean, dry spoon when scooping out the oil to avoid introducing moisture or bacteria. If the oil thickens in the fridge, simply let it sit at room temperature for 20–30 minutes before using it.
Ways to Customize Your Chili Oil
Once you've nailed the basic recipe, the fun begins. Customizing your chili oil lets you tailor it to your preferred heat level and flavor profile, making it uniquely yours.
Controlling the Spice Level
The heat of your chili oil depends largely on the type of chili peppers you use. Want sharp, fiery heat? Go for Thai red chilies. Prefer something milder? Ancho peppers bring a gentle smokiness. Guajillo offers a balanced, medium heat, while Chiles de Arbol deliver an intense kick.
For even more control, decide what to do with the seeds - keep them in for maximum heat or remove them for a gentler touch. The ratio of oil to chili flakes also plays a role. A standard mix uses 1.5 cups of oil to 0.75 cups of chili flakes, but doubling the oil to 3 cups will tone down the spice. Feeling adventurous? Add just a tablespoon of finely ground dried ghost pepper - packing over 1,000,000 Scoville units - for a seriously fiery version.
"Fresh chili oil - or chili oil that has just been made - will be relatively mild. But once the oil is stored, the chilies will continue to release heat." - Kristen Eppich, Food Editor
This flexibility allows you to craft a bold, low-sodium condiment that aligns with a health-conscious lifestyle.
Adding Complementary Ingredients
Beyond adjusting the heat, you can completely transform the flavor by incorporating additional ingredients. For a crunchy, textured chili oil, toss in toasted sesame seeds or unsalted roasted peanuts. Want a deeper, savory kick? Stir in shiitake or porcini mushroom powder to enhance the umami.
Aromatics are another way to elevate your oil. Fry sliced shallots, ginger matchsticks, or green onions until golden, then remove them to avoid spoilage. Refrigerating the oil afterward ensures it stays safe to use. For a Thai-inspired twist, infuse the oil with lemongrass stalks during cooking. If you're leaning toward Southwest flavors, add cumin, oregano, and turmeric. To brighten the oil without adding salt, finish with a splash of Chinese black vinegar or fresh lime juice just before serving.
These tweaks let you experiment endlessly, showcasing the versatility of your homemade chili oil.
Conclusion
Making your own low-sodium chili oil at home gives you the freedom to skip preservatives, additives, and unnecessary sodium, all while adding bold flavor to meals like scrambled eggs or grain bowls.
The choice of oil is crucial. A high-quality extra virgin olive oil, such as Big Horn Olive Oil's Ultra Premium EVOO, creates a fragrant base that complements your spices while steering clear of the negative effects of processed oils. As Shilpa Uskokovic, Editor at The Kitchn, emphasizes:
"Because [the recipe] has so few ingredients, it's essential to ensure those ingredients are good-quality".
Once you’ve selected your oil, managing the heat is just as important. Gently heat the olive oil to a range of 200°F to 215°F to preserve its subtle flavors. After infusing, store the chili oil in an airtight jar in the refrigerator, where it will stay fresh for up to six months.
Use this versatile oil to elevate dishes like noodles, pizza, or roasted vegetables, all while keeping sodium in check.
FAQs
How can I make chili oil safe if I want garlic flavor?
To give your chili oil a garlic kick without compromising safety or taste, gently heat the oil with garlic at a low temperature - about 300°F. This method avoids burning the garlic, which can lead to a bitter flavor. Once the oil has cooled, strain out the garlic pieces to maintain both the flavor and safety of your chili oil.
What’s the easiest way to fix chili oil that tastes burnt or bitter?
When your chili oil turns out burnt or bitter, it’s likely due to overheating during the infusion process. To fix this, focus on using low and steady heat when combining the oil with aromatics and spices. High heat can scorch the ingredients, leading to an unpleasant, bitter taste. By gently heating the oil, you’ll preserve the delicate flavors and create a well-balanced, aromatic chili oil. Patience is key!
Can I use this chili oil for cooking, or only as a finishing oil?
You can use this chili oil in two ways: as a finishing touch or while cooking. It's perfect for stir-fries, noodle dishes, or any recipe that could use a bit of heat. Simply adjust the amount to match your taste and how spicy you want the dish to be.