

Ultimate Guide to Canning Balsamic Chutneys
Balsamic chutney combines fruits or vegetables with balsamic vinegar, sugar, and spices for a rich, tangy, and slightly sweet flavor. Canning this condiment ensures safe, long-term storage while preserving its taste. Here's what you need to know:
-
Why Can Balsamic Chutney?
The canning process prevents spoilage by eliminating microorganisms and creating a vacuum seal. Properly canned chutney lasts up to a year when stored in a cool, dark place. -
Key Ingredients and Tools:
Use fresh produce like apples, peaches, or onions, and high-quality balsamic vinegar with at least 5% acidity. Essential tools include canning jars, a water bath canner, and a jar lifter. -
Steps to Make and Can:
- Prepare produce by peeling, chopping, or blanching as needed.
- Simmer ingredients with balsamic vinegar until thickened.
- Fill sterilized jars, leaving ½ inch of headspace, and seal.
- Process jars in a water bath based on your altitude.
-
Storage Tips:
Store sealed jars in a cool, dry place. Once opened, refrigerate and use within 2-3 days.
Balsamic chutneys pair well with roasted meats, cheese boards, or as a spread. Using high-quality balsamic vinegar enhances both flavor and safety, ensuring a delicious addition to your pantry.
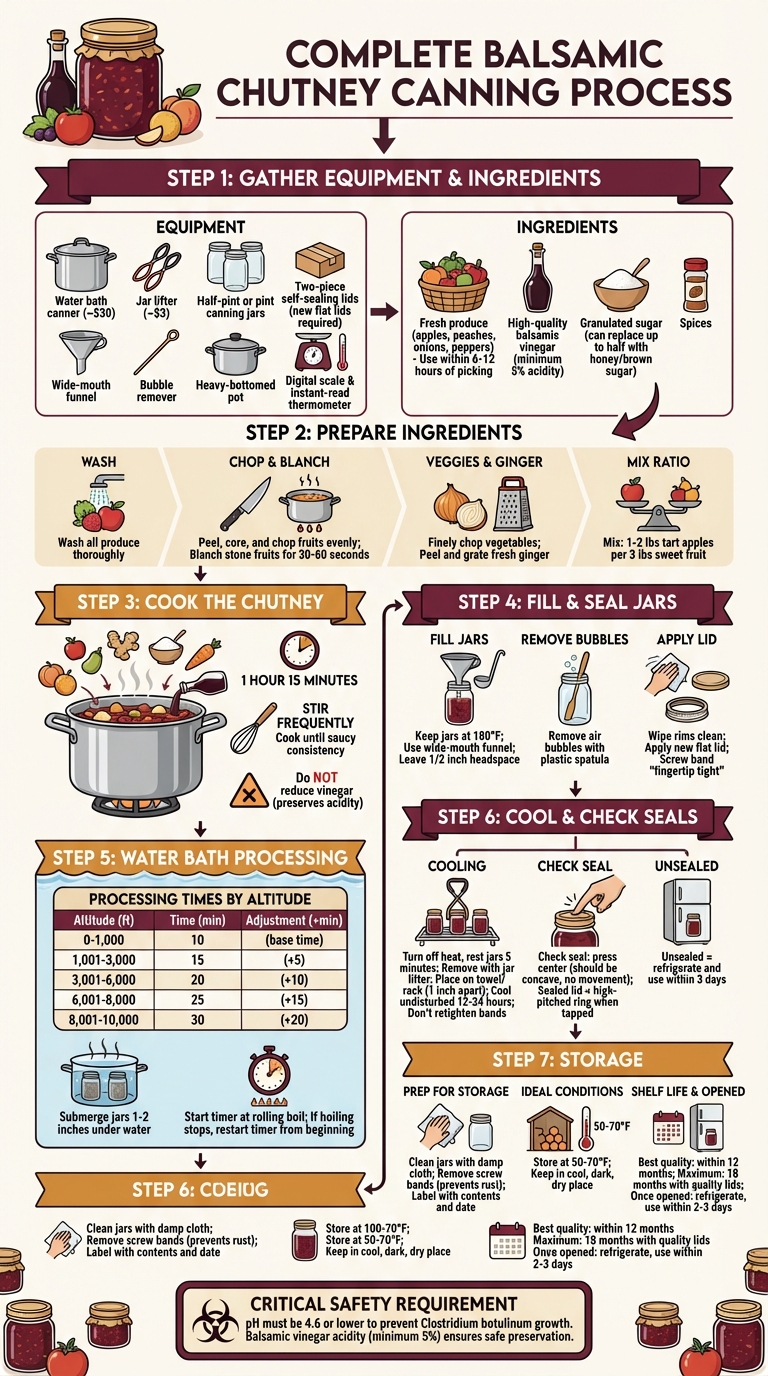
Complete Balsamic Chutney Canning Process: From Preparation to Storage
Equipment and Ingredients You'll Need
Canning Tools and Equipment
Having the right tools is essential for safe and efficient canning. First on your list should be a water bath canner. This is essentially a large kettle with a lid and a jar rack that keeps jars elevated off the bottom. If you don’t have one, a deep stockpot works just as well, provided it’s deep enough to submerge your jars by 1–2 inches. A water bath canner with a rack typically costs around $30.
Next, you’ll need a jar lifter with rubber-coated ends (usually priced around $3) to safely handle hot jars. Standard threaded canning jars are a must - half-pint or pint sizes are ideal for chutney. These jars come with two-piece self-sealing lids: a flat metal lid and a screw band. Always use brand-new flat lids for each canning session to ensure a proper vacuum seal. However, jars and bands can be reused as long as they remain undamaged.
Other essential tools include a wide-mouth funnel, a bubble remover (a non-metal spatula or plastic tool works well), a ladle, a heavy-bottomed pot, a digital scale, and an instant-read thermometer. Once your equipment is ready, it’s time to gather fresh ingredients for your chutney.
Core Ingredients for Balsamic Chutneys
Start with the freshest produce you can find. Ideally, use fruits and vegetables within 6–12 hours of picking. Opt for firm, unblemished options such as apples, peaches, or raisins. For vegetables, onions and peppers are common choices. You’ll also need a sweetener - granulated sugar is the go-to option, but you can replace up to half of it with mild honey or light brown sugar. Sugar plays a key role in maintaining the fruit’s shape, color, and flavor during the canning process.
The key ingredient in balsamic chutneys is, of course, high-quality balsamic vinegar. Two excellent options are Big Horn Olive Oil's Traditional 18-Year Aged Dark Balsamic Vinegar ($8.99) and Molto Denissimo 25-Year Aged Dark Balsamic Vinegar ($12.99). Both are sourced from Modena, Italy, and meet the required acidity level of at least 5% for safe water bath canning.
When shopping for balsamic vinegar, look for the "Balsamic Vinegar of Modena PGI" seal, which guarantees the product adheres to strict EU production standards. Check the ingredient list carefully - vinegars listing grape must as the first ingredient will have a sweeter profile, while those with wine vinegar listed first will be tangier. Steer clear of products containing thickeners like cornstarch or guar gum, as these can compromise the quality of your chutney.
How to Make Balsamic Chutneys
Preparing Your Ingredients
Start by thoroughly washing all your produce. For fruits, peel, core, and chop them evenly. If you're using stone fruits like peaches or apricots, blanch them in boiling water for 30–60 seconds, then plunge them into cold water. This makes peeling easier. Once peeled, remove the pits and chop the fruit uniformly. For vegetables such as onions and peppers, finely chop them. If you're working with hot peppers, remove the seeds and wear gloves to protect your skin.
Fresh ginger should be peeled and either finely grated or chopped. For whole spices, tie them in a cheesecloth bag so they can be easily removed later. To balance flavors, use a mix of sweet and tart fruits - for example, 1–2 pounds of tart apples for every 3 pounds of sweet fruit.
Cooking the Chutney
Once your ingredients are ready, it's time to cook. Use a stainless steel stockpot to avoid any unwanted reactions between the ingredients and the pot.
Combine the prepared fruits, vegetables, and sugar, then bring the mixture to a simmer. Add your balsamic vinegar - something like Big Horn Olive Oil's Traditional 18-Year Aged Dark Balsamic Vinegar is a great choice. Let the mixture simmer for about 1 hour and 15 minutes, stirring frequently to prevent it from burning. The chutney is ready when it thickens to a saucy consistency. For apple-based chutneys, it should have a texture similar to fruit butter.
It's important not to reduce the vinegar, as its acidity is crucial for preserving the chutney safely. While you can tweak the dry spices to suit your taste, make sure to keep the right balance of fruits, vegetables, and vinegar.
Filling and Sealing Jars
To avoid thermal shock, keep your jars at around 180°F . Use a wide-mouth funnel to fill the jars with the hot chutney, leaving about 1/2 inch of headspace.
Run a flat plastic spatula around the inside edge of each jar to release air bubbles. Wipe the rims clean, then place a new flat lid on top. Screw the band on "fingertip tight", allowing air to escape during processing .
Water Bath Canning Instructions
Sterilizing Jars and Lids
Once your jars are filled and sealed, it's time to move on to water bath canning. Sterilizing jars is only necessary when the processing time is under 10 minutes. Since most chutney recipes require processing for 10 minutes or more, a thorough wash in hot, soapy water or a cycle in the dishwasher will do the trick. Keep the jars hot - about 180°F - until you're ready to fill them. This helps prevent thermal shock, which can crack jars.
As for the lids, modern canning lids work best at room temperature, so there’s no need to boil them. Ball® Mason Jars advises:
"The sealing compound... performs better at room temperature than it does pre-heated in simmering water".
Simply wash the lids in hot, soapy water and let them dry. If you’re concerned about mineral deposits clouding your jars, add a few tablespoons of white vinegar to the canning water.
Processing Times by Altitude
After prepping your jars, it’s important to adjust the processing time based on your altitude. The higher you are above sea level, the lower the temperature at which water boils, meaning you’ll need to process your jars for longer. For balsamic chutneys, the standard processing time is 10 minutes at sea level. Use the table below to determine any additional time:
| Altitude (Feet) | Additional Processing Time |
|---|---|
| 0 – 1,000 ft | 0 minutes (use base recipe time) |
| 1,001 – 3,000 ft | Add 5 minutes |
| 3,001 – 6,000 ft | Add 10 minutes |
| 6,001 – 8,000 ft | Add 15 minutes |
| 8,001 – 10,000 ft | Add 20 minutes |
Make sure the jars are submerged under at least 1 to 2 inches of water throughout the process. Start your timer once the water reaches a rolling boil. If the water stops boiling for any reason, you’ll need to reset the timer. Susan Mills-Gray from the University of Missouri Extension explains:
"If the water stops boiling at any time during the process, turn the heat on its highest setting, bring the water back to a vigorous boil. Begin the timing of the process over, from the beginning".
Once the processing is complete, you’re ready to move on to the cooling phase.
Cooling and Checking Seals
When the processing time is up, turn off the heat and let the jars rest in the water for 5 minutes. This pause helps prevent siphoning and encourages a proper seal. Carefully remove the jars using a jar lifter and place them on a towel or cooling rack, leaving at least 1 inch of space between them. Let the jars cool undisturbed for 12–24 hours. Avoid retightening the bands during this time, as it can interfere with the sealing process.
To check the seal, press down on the center of each lid - it should be slightly concave and not move. A sealed lid will also produce a high-pitched ring when tapped, unlike a dull thud. If a jar hasn’t sealed, you can refrigerate it and use the chutney within three days, or reprocess it within 24 hours using a new lid and the full processing time. For long-term storage, remove the screw bands after the jars are sealed. This makes it easier to spot any lids that may unseal due to spoilage.
sbb-itb-4066b8e
Storage and Serving Ideas
How to Store Canned Chutneys
Once your jars have cooled and sealed properly, take a moment to clean them thoroughly. Use a damp cloth to wipe away any sticky residue - this helps prevent pests and mold from becoming an issue. It’s also a good idea to remove the screw bands. This prevents rusting and makes it easier to notice if a seal has failed.
Label each jar with its contents and the processing date, then store them in a cool, dark, and dry place. Aim for a temperature range between 50°F and 70°F, and keep the jars away from heat sources like stoves, furnaces, or attics where temperatures can swing unpredictably. Heat and light can harm the chutney’s quality - light can fade vitamins and discolor the contents, while moisture can corrode lids and compromise the seal.
For the best flavor and texture, enjoy your chutneys within 12 months. While some high-quality lids may extend shelf life up to 18 months, the quality usually starts to decline after a year. If stored at temperatures above 95°F, chutneys can lose quality quickly and may even spoil. Once you open a jar, refrigerate it right away and aim to finish it within 2 to 3 days. With proper storage, these chutneys will be ready to add a burst of flavor to your meals.
Ways to Use Balsamic Chutneys
With your chutneys safely stored, it’s time to think about how to enjoy them. Balsamic chutneys are incredibly versatile, offering a sweet, tangy, and spicy kick that can elevate a variety of dishes. They’re perfect alongside roasted meats, poultry, or fish, and they shine on cheese boards or paired with crackers. You can even use them as a dip for breadsticks or as a savory spread for sandwiches. If you’re feeling adventurous, try swapping out your usual jam for a chutney on toast, or stir some into salads or casseroles for added depth of flavor.
For an extra touch of richness, consider using high-quality balsamic vinegars like Big Horn Olive Oil's Traditional 18-Year Aged Dark Balsamic Vinegar or Molto Denissimo 25-Year Aged Dark Balsamic Vinegar. These chutneys are a simple way to bring bold, exciting flavors to your table.
Canning Onion Recipe | Perfect for EVERY Meal (& I'll PROVE IT) |Sweet Balsamic & Rosemary Onion Jam
Conclusion
Making balsamic chutneys at home requires careful attention to detail and top-notch ingredients. One of the most important safety steps is ensuring the pH level is 4.6 or lower, which prevents harmful bacteria like Clostridium botulinum from growing. The National Center for Home Food Preservation emphasizes:
"The acidity from the added vinegar and the natural acids of the fruit prevents growth of several spoilage and pathogenic bacteria, molds and yeasts".
This critical step not only safeguards your chutney but also sets the foundation for using high-quality vinegars that enhance flavor and preservation.
The choice of balsamic vinegar plays a huge role in both the safety and taste of your chutney. Authentic balsamic vinegars, particularly those from Modena, Italy, are known for their rich, sweet-tart flavor developed through years of aging. Made primarily from grape must, these vinegars have a naturally thick texture and a delicate sweetness that can transform your chutney into something truly special. As The Olive Bar describes:
"Authentic balsamic vinegar offers a complex balance of sweet and sour notes, with hints of fruit, wood, and other subtle flavors. It should not be overly acidic or have a harsh, vinegary taste".
FAQs
Why should I use high-quality balsamic vinegar in my chutneys?
Using top-notch balsamic vinegar in your chutneys takes their flavor to the next level with its deep, layered sweetness and a touch of tang. The natural acidity in aged balsamic vinegar not only boosts the taste but also acts as a natural preservative, helping your chutneys last longer. Choosing a high-quality option, such as those offered by Big Horn Olive Oil, ensures a smoother, polished finish for your creations.
How can I safely can balsamic chutney to prevent harmful bacteria like botulism?
To ensure your balsamic chutney is safe for canning and free from harmful bacteria like Clostridium botulinum, it's essential to stick to proper canning techniques. For low-acid foods, always use a pressure canner. Unlike the boiling water method, a pressure canner can reach the high temperatures - at least 240°F - needed to destroy botulism spores. Make sure your canner is in good working order and process at the correct pressure for your altitude.
Stick to scientifically tested recipes to guarantee the chutney has the right acidity levels. Once processed, double-check that all jars are tightly sealed. Following these steps will help you safely preserve your chutney for long-term storage and enjoyment.
How can I use balsamic chutneys to enhance my meals?
Balsamic chutneys bring a delightful mix of sweetness and tanginess that can transform a variety of dishes. They work wonderfully as a topping for grilled meats, poultry, or roasted vegetables, creating a perfect harmony of savory and sweet flavors. They’re also a fantastic addition to cheese boards, complementing cheeses and crackers with their rich taste.
Want to take your cooking up a notch? Spread balsamic chutney on sandwiches or burgers for a gourmet twist, or use it as a glaze for pork or chicken to enhance their flavor. You can even stir it into salad dressings or drizzle it over roasted veggies to add a new layer of complexity. Whether it’s a casual weeknight dinner or a special occasion, balsamic chutneys are an easy way to pack bold, delicious flavor into your meals.