

Chili Infusion Safety Tips for Olive Oil
Homemade chili oil is not shelf-stable. If I make it at home, I should use fully dried chilies, keep everything clean and dry, hold heated oil near 180°F if I use a warm method, and store the finished bottle at 40°F or below.
Here’s the short version:
- I treat chili-infused oil like a perishable food
- I use dried chilies as my default choice
- If I use chilies with moisture, I keep the oil refrigerated and use it fast
- I sanitize bottles, lids, tools, and counters before starting
- I label each bottle with a prep date and use-by date
- If I see cloudiness, bubbling, mold, leaks, or off smells, I throw it out
- I never taste a batch I suspect may be unsafe
A few facts matter here. Clostridium botulinum can grow in low-acid, low-oxygen foods like produce packed in oil, and the toxin may not change the smell or taste. That’s why clean tools, low moisture, cold storage, and short storage time matter more than flavor or oil quality.
| Topic | What I do |
|---|---|
| Chili choice | Use fully dried chilies |
| Bottle prep | Wash, sanitize, and dry fully |
| Infusion | Cold infuse dried chilies only, or heat oil to about 180°F |
| Storage | Refrigerate at 40°F or below |
| Timing | Label right away; if using moist chilies, use within 4 days |
If I want chili oil that tastes good and stays safer to use, this is the basic checklist I follow.
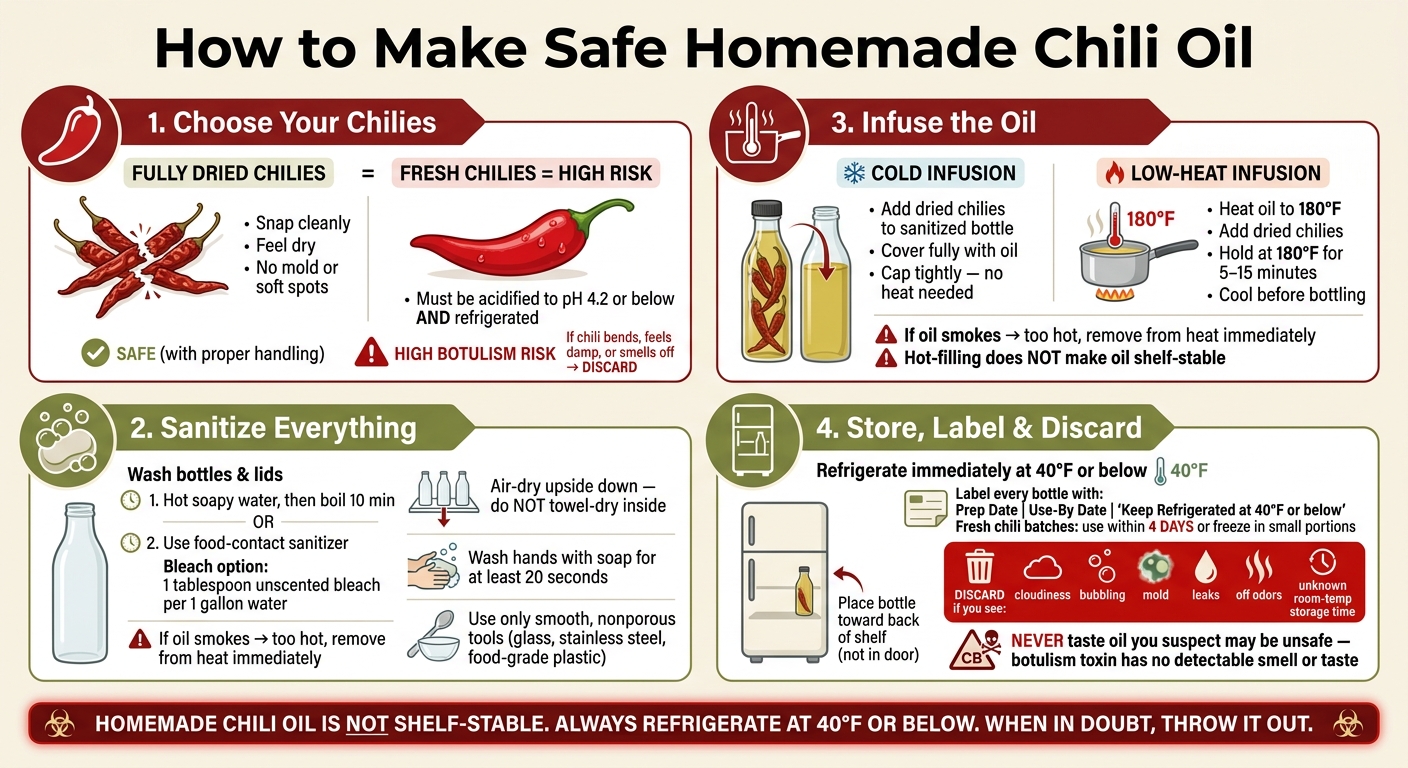
How to Make Safe Homemade Chili Oil: Step-by-Step Guide
1. Understand the Risks Before You Start
Use Dried Chilies for the Safest Home Infusion
Start with the chilies. The amount of moisture in them makes a big difference in safety.
Use fully dried chilies only for the safest home infusion. They should snap cleanly, feel dry, and show no mold, soft spots, or musty odor. If a chili bends, feels damp, or smells off, throw it out. If it is not fully dry, treat it like a refrigerated ingredient instead.
Treat Fresh Chilies as Refrigerated Only
Fresh chilies are low-acid and hold much more moisture than dried ones, which makes them a higher-risk ingredient in oil.
That means any fresh-chili oil should be treated as perishable. Keep it refrigerated at 40 °F or below and use it quickly.
If you decide to use fresh chilies, acidify them first with a tested method that reaches pH 4.2 or below within 24 hours. Even then, refrigeration at 40 °F or below is not optional. If the chilies are not dry enough, not acidic enough, or the oil is left out of the fridge, the oil is unsafe.
Conditions That Make Infused Oil Unsafe
A few warning signs should stop you in your tracks:
- Fresh or rehydrated chilies used without acidification and stored outside the refrigerator
- Wet containers or utensils that add moisture to the oil
- Any fresh-chili oil stored outside the refrigerator
- No prep date or use-by date on the bottle
- Cloudiness, bubbling, off odors, or mold in a finished batch - discard immediately
If any of these show up, discard the oil right away. Reheating it or thinning it out will not make it safe.
sbb-itb-4066b8e
2. Sanitize Bottles, Tools, and Your Work Area
Once you've picked dry chilies, the next safety move is simple: start with a clean, dry workspace.
Wash and Sanitize Bottles and Lids Completely
Wash bottles and lids in hot, soapy water, then rinse them well. After that, sanitize them by boiling for 10 minutes or by using a label-approved food-contact sanitizer.
If boiling doesn’t work for your setup, you can use a dilute bleach mix instead - about 1 tablespoon of unscented household bleach per 1 gallon of water - but only if the product label says it’s okay for that use.
Let bottles and lids air-dry upside down on a clean rack. Don’t towel-dry the inside. Even a clean towel can put contamination right back on the surface. And don’t fill them until they’re fully dry.
Clean All Utensils and Surfaces Before Use
Anything that touches the chilies or oil needs the same treatment. That includes funnels, knives, spoons, tongs, and cutting boards. Wash, rinse, and sanitize each item, then wipe down countertops with a kitchen sanitizer or the same bleach mix used for containers.
Skip tools that are cracked, deeply scratched, or porous. Wooden utensils with splits and cutting boards covered in heavy knife marks can hold onto food bits and moisture long after washing. That’s not a risk worth taking. Go with smooth, nonporous materials like intact glass, stainless steel, or undamaged food-grade plastic.
Start With Clean Hands and a Dry Setup
Wash your hands with soap and warm water for at least 20 seconds before touching bottles, chilies, or tools. Then dry them with a clean towel or a single-use paper towel. Damp reusable towels can pass contamination from one surface to another.
Keep the whole setup dry. Water on bottles, lids, tools, or chilies adds moisture to the oil, and that increases safety risks in homemade infused oil.
With the workspace clean and dry, the next step is temperature control during infusion.
3. Use a Safe Infusion Method and Control Temperature
Once your workspace is clean and dry, it’s time to infuse the oil. For home cooks, there are two common options: cold infusion and low-heat infusion. Both work best when the chilies are fully dry and the temperature stays under control.
Cold Infusion Using Dried Chilies Only
Cold infusion is the easier method. Add fully dried chili flakes or whole dried chilies to a sanitized, dry bottle with clean utensils. Don’t touch the inside of the bottle with bare hands. Then pour in enough oil to cover the chilies fully, leaving a little headspace at the top.
Make sure every piece of chili stays below the oil line. If any bits stick up, they can mold faster. Cap the bottle tightly, then wipe the outside clean.
Low-Heat Infusion at Around 180 °F
This method starts the same way: use a dry, sanitized setup. Warm the oil in a clean, heavy-bottomed saucepan over medium-low heat to 180 °F and track the temperature with a thermometer. Add the dried chilies, keep them submerged, and hold the oil near 180 °F for 5 to 15 minutes. Then take it off the heat.
If the oil starts to smoke, it’s too hot. Remove it from the heat right away. After it cools, strain it if you want a clearer oil.
Let the oil cool before bottling or refrigerating it. Hot-filling does not make chili oil shelf-stable. Every batch should be refrigerated.
Start With a High-Quality Extra Virgin Olive Oil
Start with a fresh, high-quality extra virgin olive oil, and keep it in a cool, dark place until you’re ready to infuse it.
4. Refrigerate, Label, and Discard on Time
Keep Homemade Chili Oil at 40 °F or Below
Once the oil has cooled, put it in the fridge right away. At that point, storage is just as important as how you made it in the first place.
If your batch includes fresh chilies or any other moist ingredients, keep it refrigerated at 40 °F or below. Don’t just assume your fridge is cold enough, either. Use a refrigerator thermometer to check that it’s actually holding 40 °F or lower, and place the bottle toward the back of a shelf instead of in the door, where temperatures tend to swing more often.
Label Each Bottle With a Prep Date and Use-By Date
Label the bottle before you store it. Do it right away, while the prep date is still clear and easy to track.
Each bottle should include:
- Prep date
- Use-by date
- "keep refrigerated at 40 °F or below"
For batches made with fresh chilies, use the oil within 4 days. If you made more than you can use in that time, freeze the extra in small portions.
Conclusion: The Short Checklist That Keeps Chili Oil Safe
If anything seems off, throw it out. That includes off odors, bubbling, leaks, cloudiness, mold, or any batch that sat at room temperature for an unknown amount of time.
And one more thing: never taste oil you suspect may be unsafe. Botulism toxin can be present without any warning signs you can pick up by tasting it.
FAQs
Can I leave homemade chili oil at room temperature?
It comes down to what's in the oil. If your chili oil has fresh garlic, fresh peppers, or other fresh aromatics, put it in the fridge right away. That helps lower the risk of botulism.
If the oil is made only with dried ingredients, it's usually fine at room temperature as long as you keep it in a cool, dark place. Before using it, check for cloudiness or any odd smell. If anything seems off, throw it out.
How long does refrigerated chili-infused olive oil last?
It depends on the ingredients.
With fresh garlic or fresh chilies, keep the oil in the refrigerator at or below 40°F and use it within 1 to 2 weeks. For the safest route, some methods suggest using it within 4 to 7 days.
Infused oils made with dried chilies only can keep for up to 6 months in the refrigerator.
A couple of simple rules matter here:
- Use sterilized containers
- Throw the oil away if you notice any signs of spoilage
Do I need to acidify fresh chilies before infusing them in oil?
Yes. If you use fresh chilies for an oil infusion, acidify them first to help cut the risk of botulism.
Soak chopped chilies in 1 tablespoon of citric acid mixed with 2 cups of water for at least 24 hours. Then drain them and pat them completely dry. Store fresh-infused oils in the refrigerator and use them within 1 to 2 weeks.