

Greek Olive Brining: Step-by-Step Guide
Want to turn bitter olives into a delicious pantry staple? Greek brining is the way to go. This time-tested process uses saltwater to remove bitterness and ferment olives, creating the tangy, flavorful result you love. Here’s what you’ll do:
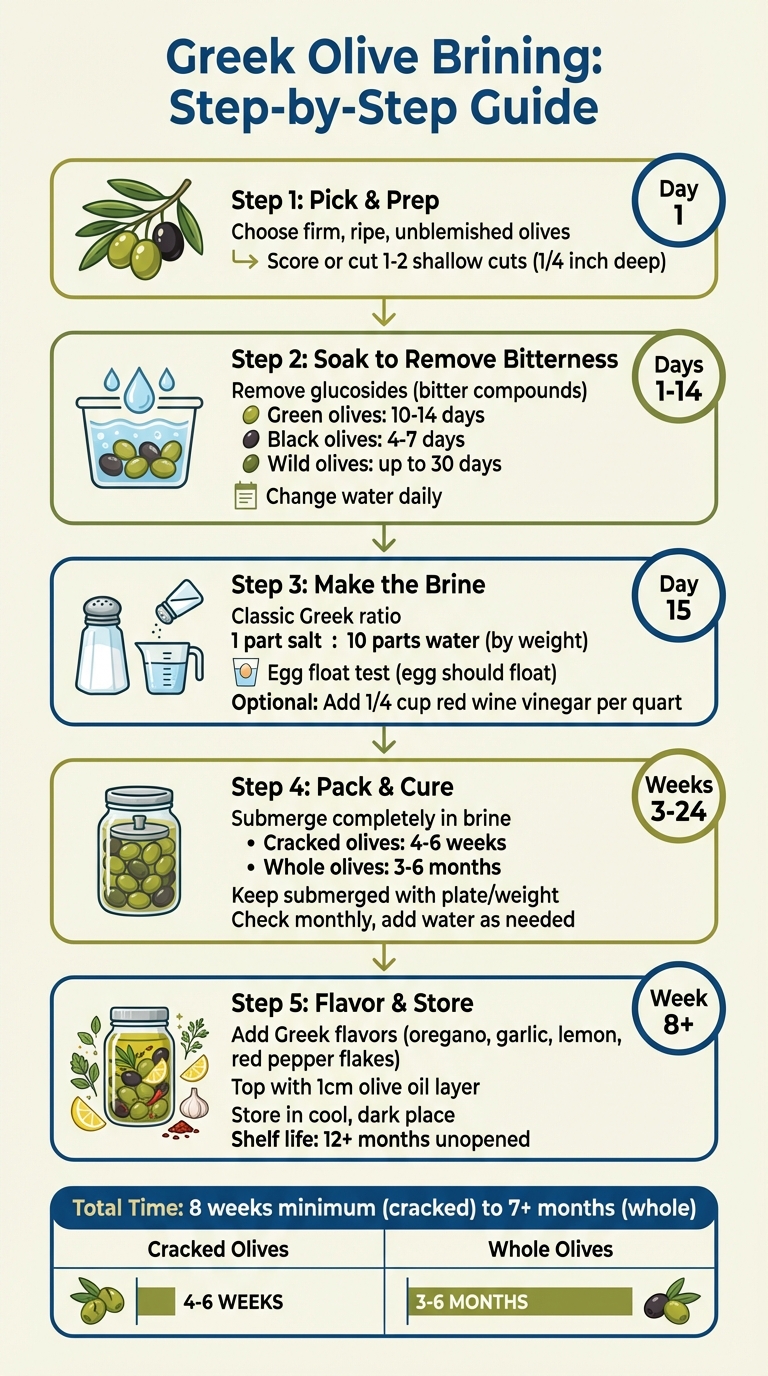
- Pick the best olives: Choose firm, ripe, unblemished olives (green or black) and prep them by scoring or cutting for faster curing.
- Soak to remove bitterness: Green olives soak for 10–14 days, black for 4–7 days, with daily water changes.
- Make the brine: Use 1 part salt to 10 parts water. Test salinity with the egg float method.
- Pack and cure: Submerge olives in brine for 4–6 weeks (cracked) or 3–6 months (whole). Add optional flavors like vinegar, garlic, or herbs.
- Store properly: Use sterilized jars, keep olives submerged in brine, and add a thin layer of high-quality olive oil to prevent spoilage.
This process preserves the olives for months, giving you control over flavor and quality. Ready to start your own batch? Let’s dive in!
Greek Olive Brining Process: 5-Step Timeline Guide
Selecting and Preparing Olives
Choosing the Right Olives
The quality of your brined olives starts with the selection process. Look for the plumpest, darkest olives that are at their peak ripeness. A quick way to check is by giving an olive a gentle squeeze - if it releases a milky liquid, it’s a good sign of high oil content, making it ideal for curing.
Green olives, which are firmer and more bitter, require soaking for 10–14 days with frequent water changes, followed by brining for at least 6 weeks. Fully ripe black olives, on the other hand, are naturally less bitter and cure faster, typically in 3–6 weeks, with a sweeter flavor as the result.
After picking or purchasing, sort the olives right away. Keep green and black olives in separate batches to ensure even curing. Mixing them can lead to uneven results, where greener olives might stay too bitter while the black ones cure properly. Discard any olives that show blemishes, shriveling, soft spots, or signs of insect damage, as these can spoil the entire batch. Finally, rinse the olives thoroughly under cool water to remove any dirt or debris.
Once you've chosen and sorted your olives, the next step is preparing them for curing.
Preparing Olives for Brining
Cutting or scoring the olives is a simple yet effective way to speed up the curing process. Whole olives can take up to 6 months to fully lose their bitterness, but when scored, the time drops significantly to about 3–6 weeks. These cuts allow water and brine to penetrate deeply, helping to remove the glucosides - the compounds responsible for the bitter taste.
To prepare, use a sharp knife to make 1–2 shallow cuts (about 1/4 inch deep) along the longest side of each olive. Be careful to cut just enough to expose the flesh without slicing all the way through to the pit. This technique ensures better brine absorption and faster bitterness reduction. Avoid crushing or smashing the olives, as this can ruin their texture during the curing process.
With your olives sorted and scored, they’re ready for the soaking stage to start removing bitterness.
sbb-itb-4066b8e
Water Soaking to Remove Bitterness
Soaking Duration and Process
Fresh olives naturally contain glucosides, which are responsible for their bitter taste. Water soaking helps draw out these compounds, making the olives more palatable and ready for brining. This method is particularly useful for wild or foraged olives, which often have higher glucoside levels, resulting in a sweeter and less astringent final product.
For green (unripe) olives, soak them for 10–14 days, changing the water daily. Fully ripe black olives, on the other hand, need only 4–7 days. Wild varieties may require an extended soaking period of up to 30 days to sufficiently reduce bitterness.
To start, rinse your scored olives thoroughly, then place them in a food-grade container and cover them with fresh water. Change the water every 24 hours. While skipping a day or two won’t ruin the process, sticking to daily water changes speeds up the removal of bitterness. After about a week, taste an olive to gauge the progress. If it still tastes too bitter, continue soaking and changing the water until the flavor softens.
Once the bitterness is reduced, it’s time to focus on selecting the right container for soaking.
Choosing the Right Container for Soaking
The container you use plays a crucial role in the soaking process. Opt for food-grade, non-reactive materials like plastic buckets, glass bowls, or stainless steel basins - these won’t interact with the compounds in the olives. Avoid aluminum or copper containers, as they can react with the olives and affect the flavor.
A traditional Greek method, often referred to as "yiayia-style", involves placing the olives in a net bag inside a bucket. This setup makes draining and rinsing much easier. If floating olives become an issue, use a clean plate or weight to keep them submerged. Always soak the olives in a cool area to prevent spoilage, and ensure your container is large enough to hold both the olives and the extra water needed for daily changes.
Making the Brine Solution
Greek Brine Ratios and Techniques
The classic Greek brine ratio calls for 1 part salt to 10 parts water by weight - in other words, 1 pound of salt for every 10 pounds of water. This specific balance creates the ideal salinity to properly cure olives, avoiding both over-salting and under-preserving. It's important to use a kitchen scale to measure the salt accurately since different salts have varying densities.
To ensure your brine is at the correct strength, try the egg float method, a time-tested Greek technique. Simply place a fresh egg into the brine. If it floats, the salinity is just right. If it sinks, gradually add more salt until the egg rises. Conversely, if the egg floats too high, dilute the brine with additional water. This method takes the guesswork out of the process and ensures reliable results every time.
For example, if you're curing 5 pounds of olives, you'll need approximately 2 quarts of brine. To make it, dissolve about 6.4 ounces of salt into 4 pounds (64 ounces) of water. It's a good idea to prepare a little extra brine to ensure the olives are completely submerged.
Once your brine is ready, you can experiment with adding flavors to enhance the olives.
Optional Flavor Additions
While the base brine is just salt and water, you can take it up a notch with red wine vinegar, a beloved Greek addition. Adding about 1/4 cup of red wine vinegar per quart of brine gives the olives a subtle tang and helps maintain the acidity required for fermentation.
For extra flavor, consider including ingredients like lemon quarters, poached garlic cloves, or sliced fennel bulb. If you're adding garlic, make sure to poach it first to ensure it's fully cooked before adding it to the brine. These simple additions can transform your olives, giving them a rich and aromatic profile that stands out.
How to Brine Green Olives
Packing and Curing the Olives
Once your olives are prepped and your brine is ready, it’s time to move on to the packing and curing process.
Sterilizing Jars and Packing Olives
Start by sterilizing your jars to avoid any contamination. Wash them thoroughly with hot, soapy water, rinse well, and then boil for about 10 minutes. Keep the jars in hot water until you’re ready to fill them - this helps prevent cracking due to temperature changes. For the lids and bands, soak them in hot (not boiling) water to soften the sealing compound.
When your jars are ready, pack the olives tightly, but be careful not to crush them. Leave about 1 inch of space at the top to allow for the brine and any fermentation activity. Pour your prepared brine over the olives, making sure they’re completely submerged.
Submerging and Brining Techniques
It’s essential to keep the olives fully submerged during the curing process. Neil Seymour, Co-Founder of Mount Zero Olives, highlights this point:
Place a screen or plate on top of the liquid to ensure that all the olives are totally immersed and remain that way throughout the process.
You can use a small plate or similar object to weigh the olives down. Cover the container loosely to allow fermentation gases to escape. Check on the olives monthly, adding fresh water if necessary to keep them covered. If you notice mold forming on the surface, don’t panic - just ensure the olives stay submerged beneath the mold layer.
Curing Timeline and Taste Testing
The curing process varies depending on how the olives were prepared. Cracked olives usually take 4 to 6 weeks, while whole olives may require 3 to 6 months to fully cure. The salt brine works to break down oleuropein, the compound responsible for the olives’ natural bitterness.
After the initial curing period (4–6 weeks for cracked olives or 3–6 months for whole ones), start taste-testing. Continue until the olives reach your preferred level of bitterness and fermentation is complete.
Flavoring, Finishing, and Storing Brined Olives
Adding Greek Flavor Enhancements
Once the initial curing process is complete, it's time to infuse your brined olives with traditional Greek flavors. Classic additions like dried oregano and red pepper flakes bring that unmistakable Mediterranean touch to your olives. Fresh ingredients such as garlic cloves, rosemary sprigs, and lemon slices can also be included for an extra burst of flavor. To achieve a more traditional Greek taste, try adding fennel seeds or dried chili flakes before sealing your jars.
For a richer finish, pack the olives in extra virgin olive oil. This not only enhances their flavor but also helps with preservation. Alternatively, serve them tossed with garlic, cherry tomatoes, and olive oil for a simple yet delicious dish. Don’t discard the olive brine - it’s perfect for marinades or keeping the olives firm and flavorful.
Final Curing and Readiness
After about 8 weeks of curing, start taste-testing your olives. Keep in mind that larger or green olives often need more time to mellow compared to smaller or black varieties. Once the bitterness has faded to your liking, drain and rinse the olives, then transfer them to a lighter brine made with 500 grams of salt per 10 liters of water.
Proper Storage for Brined Olives
Storing your olives correctly is crucial for maintaining their quality and freshness. Begin by sterilizing glass jars. Wash them thoroughly with hot soapy water, then place them in an oven at 350°F for 15 minutes to ensure they’re free of contaminants. Fill these jars with your finished olives and flavorings, cover them with brine, and top with a thin layer of olive oil - about 1 cm.
"Before sealing the jar, add about 1cm of extra virgin olive oil to coat the surface of the brine to stop any air from getting to your olives or the brine from going mouldy." - Mount Zero Olives
This layer of olive oil acts as a protective barrier, keeping air out and preventing mold from forming. Store unopened jars in a cool, dark, and dry spot, like the back of your pantry. Properly stored, they’ll last for at least 12 months. Once you open a jar, move it to the refrigerator to maintain freshness. Always ensure the olives remain fully submerged in brine, as exposure to air can lead to discoloration or unpleasant flavors.
Troubleshooting Common Issues
During the curing process, a few challenges might pop up that need some quick fixes. Here's how to handle them:
White Film or Lacto-Fermentation
If you notice a thin, white or cream-colored film on the surface of your brine, it’s likely Kahm yeast, not mold. This harmless yeast forms when the brine is exposed to air and can slightly affect the flavor. To deal with it, skim the film off with a clean spoon and keep curing as usual. To prevent it from coming back, ensure your olives stay submerged. You can use fermentation weights or even a clean cabbage leaf to keep them below the brine.
Maintaining a brine concentration of 3.5–5% and storing the container in a cool spot (65–75°F or 18–24°C) can also help. An airlock lid might be useful, as it allows carbon dioxide to escape while keeping oxygen out. Don’t worry if your brine turns cloudy - this is a normal sign of lactic acid bacteria doing their job to cure the olives and isn’t something to stress over.
If the issue persists, bitterness in the olives might indicate the need for further adjustments.
Persistent Bitterness
If your olives still taste too bitter after the curing period, you may need to extend the soaking time. Brine curing, especially for green olives, can take months to fully remove oleuropein, the compound responsible for bitterness. This slow process helps maintain the olives’ firm texture and rich extra virgin olive oil flavor. Some varieties, like Halkidiki olives, may naturally retain a slight bitterness, which is considered part of their authentic taste. If you prefer a milder flavor, simply give the curing process more time.
Signs of Spoilage
It’s important to keep an eye out for signs of spoilage. If you see green, blue, or black mold, it’s best to discard the entire batch. While a sharp, vinegary, or pungent smell is normal during fermentation, a putrid odor - similar to rotten meat or garbage - is a clear sign of spoilage. If you detect this, the batch should be thrown out immediately.
Conclusion
Preparing olives the Greek way turns bitter fruit into a flavorful delicacy. It’s a process that requires attention to detail at every stage - from choosing the best olives and soaking them to reduce bitterness, to crafting the perfect brine and patiently curing them for weeks or even months. Each step plays a crucial role in achieving the final product.
The foundation of success lies in starting with high-quality, unblemished olives, which is essential for capturing that classic Greek flavor.
Timing and freshness also play a big part. To enjoy the best taste, olives should be consumed within nine months of harvest. Proper storage in well-suited containers ensures the flavors are preserved at their peak.
FAQs
What type of salt should I use for olive brine?
For brining olives, stick to pickling salt or Kosher salt - just make sure it's not iodized. The Greek method suggests starting with 126 grams of salt per pound of olives or 42 grams per quart of water for the initial brine. As fermentation progresses, increase the salt concentration to 84 grams per quart of water. Steer clear of iodized salt since it can affect both the flavor and the fermentation process.
How do I know my olives are fermenting safely?
To keep fermentation safe, monitor for gas buildup that can cause lids to bulge - if this happens, carefully loosen the lid and reseal it. Always ensure the olives stay fully submerged in the brine to avoid mold, using a weight if needed. Bubbles in the brine? No need to worry - that's a typical sign of active fermentation. However, if you detect foul smells, mold, or a slimy texture, it's best to discard the olives, as these are signs the fermentation process isn't safe.
Can I fix olives that turn out too salty?
Reducing the saltiness of olives is simple. Just soak them in fresh water for 7–14 days, making sure to change the water daily. This technique, often used in Greek-style olive brining, helps draw out excess salt and bitterness. Afterward, you can fine-tune their flavor to suit your taste.