

Checklist for Olive Harvest After Rain
If rain hits during olive harvest, I treat the fruit as a race against time. Wet olives can heat up, bruise, ferment, and lose oil quality fast, so my first job is to check safety, fruit condition, handling, and mill timing before I pick anything.
Here’s the short version:
- I check access first: roads, slopes, soft soil, pooling water, and storm damage
- I inspect fruit next: dry vs. wet, clean vs. muddy, sound vs. cracked or moldy
- I pick the best blocks first: clean and dry lots before low spots or damaged fruit
- I keep lots separate: especially fruit with pooled water or flood contact
- I use shallow ventilated crates: filled only 10 to 12 inches deep
- I move fruit out of the block in 30 to 60 minutes
- I mill wet fruit first and clean mill equipment between lots
A few points matter most after rain: don’t harvest onto mud, don’t leave fruit sitting in deep bins or bags, and don’t mix damaged olives with clean ones. Even small cracks, bruising, or rot can push a lot away from extra virgin grade, while wet fruit left too long can show more acidity and oxidation risk.
| Check | What I look for | What I do |
|---|---|---|
| Orchard access | Flooding, pooling, soft ground, broken limbs | Hold unsafe blocks and shift crews |
| Fruit condition | Dry skin, mud, cracks, bruising, rot | Rank blocks and separate lots |
| Harvest handling | Wet nets, muddy ground, rough shaking | Slow picking and keep fruit clean |
| Containers | Airflow and shallow fill depth | Use ventilated crates, not bags |
| Mill timing | Delay risk and lot mix-ups | Send wet lots first and label all loads |
The whole goal is simple: keep people safe, keep fruit clean, and get rain-affected olives milled with as little delay as possible.
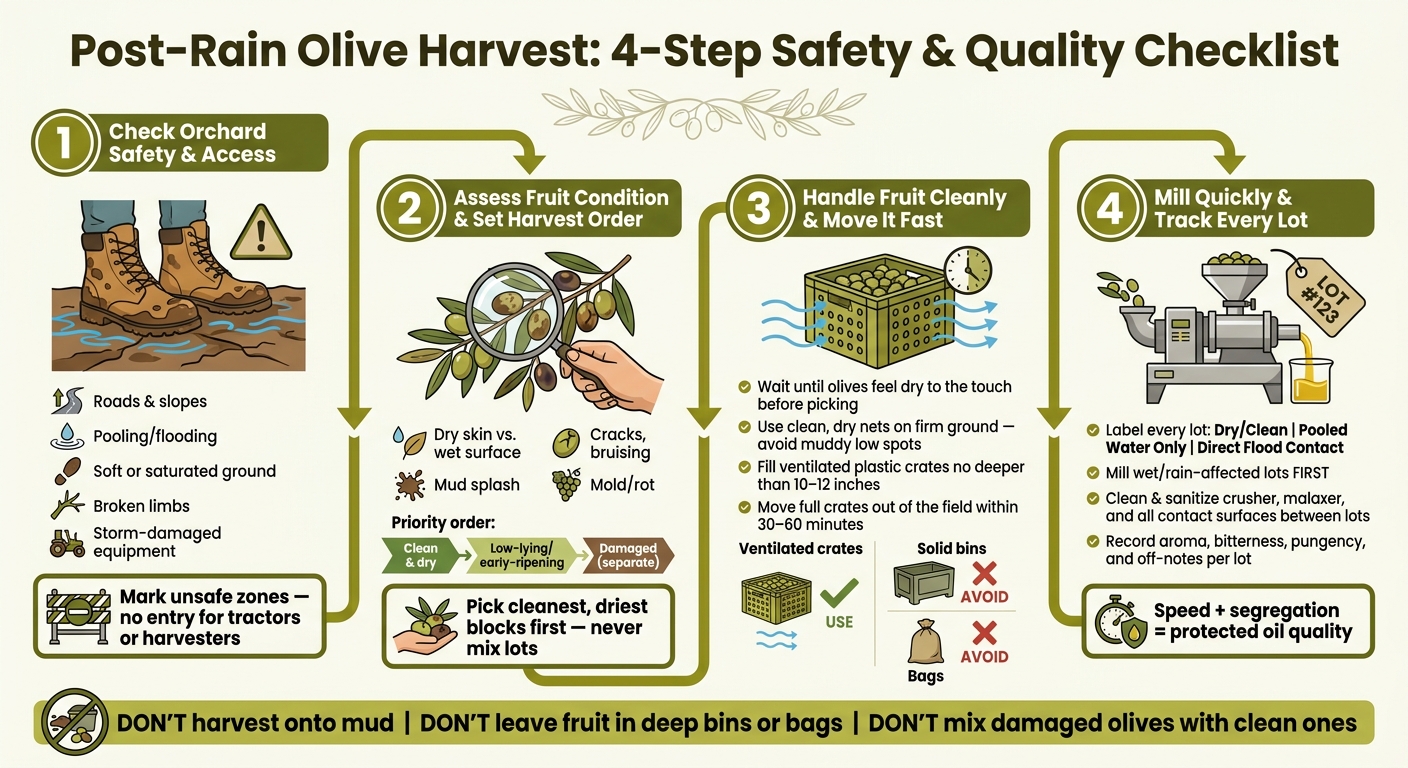
Post-Rain Olive Harvest: 4-Step Safety & Quality Checklist
Step 1: Check Orchard Safety and Access Before Resuming Harvest
Before harvest starts again, walk the orchard and make sure you can get in and out safely. Begin with the roads, then check low spots and slopes.
Inspect Roads, Slopes, and Soft Ground
Look at farm roads, headlands, and low areas for pooling or flooding. Pooling means standing water. Flooding means water has spilled over onto the land. Record the water depth, how long it stayed, and any debris. Mark saturated or unstable ground as no-entry zones for tractors and harvesters. That helps you avoid delays that can leave wet fruit sitting too long and getting warm, which can hurt quality. If a block has pooling water or soft ground, hold off on harvest there and shift crews to safer areas first.
Once the ground is stable, check both the trees and the equipment before moving into the block.
Inspect Trees and Harvest Equipment for Storm Damage
Check trees for broken limbs, leaning trunks, and wounds. Then inspect harvest equipment for clogged parts, mud, and debris. If a block has storm damage, keep it out of the harvest sequence until it is safe to enter. Only after the block passes these safety checks should you move on to fruit condition.
sbb-itb-4066b8e
Step 2: Assess Fruit Condition and Decide Which Blocks to Pick First
Once the orchard is safe, sort blocks by fruit condition before harvesting. After access is safe, inspect the fruit before crews go back in. Rain can change olive condition fast, so a short, structured check helps protect oil quality.
Confirm Olives Are Dry, Clean, and Undamaged
Sample each block from border, center, and diagonal rows. Check fruit at different heights and canopy positions.
Look for dry skin, mud splash, and damage. Dry fruit should feel dry to the touch. Mud, grit, cracks, bruising, or skin breaks all point to risk. Cut a few olives open and check for browning, insect damage, or rot.
Use what you find to set harvest order.
Pick Healthy Blocks First and Separate Damaged Fruit
Start with the cleanest, driest blocks. Then move to low-lying or early-ripening blocks, since those can decline fast.
Keep clean and damaged fruit in clearly labeled containers. Don’t mix lots. Tell the mill the condition of each lot so they can mill the right fruit first. Even a small amount of moldy or cracked fruit can spoil a clean lot.
Fruit Condition Decision Table
Use the table below to decide whether to harvest, wait, or separate the lot.
| Fruit condition | Recommended action | Oil-quality impact |
|---|---|---|
| Clean, dry, intact | Harvest as planned; group with other sound lots | Best quality; low defect risk |
| Wet surface, no mud or cracks | Wait for surface drying if possible; if not, harvest into shallow, ventilated containers and mill immediately; keep lot separate | Still usable, but delay adds defect risk |
| Muddy, no cracks or mold | Wait until mud dries if possible; otherwise harvest into separate, labeled bins, avoid overfilling, and wash gently before milling | Higher defect risk; may downgrade |
| Cracked or bruised, no mold | Harvest early, keep strictly separate, mill immediately | Likely downgrade |
| Moldy or visibly rotting | Exclude from high-quality oil; divert to lower-grade use or discard | Not suitable for extra virgin oil |
Step 3: Follow the Post-Rain Harvest and Handling Checklist
Once you've checked fruit condition and ranked your blocks, the next job is simple: handle fruit cleanly and get it out of the orchard fast. After rain, picking usually needs to slow down, while fruit hold time needs to shrink. That's how you cut down contamination risk and protect oil quality.
Adjust Picking Methods for Wet Conditions
Don't start picking while olives and leaves are still visibly wet. Wait until they feel dry to the touch, not just when they're no longer dripping.
Before crews start, place clean, dry nets or tarps under the canopy. Put them on firm, well-drained ground. Stay away from low spots where mud or standing water builds up. If a net gets muddy during harvest, flip it or replace it. If you keep harvesting onto a mud-covered surface, that dirt goes straight onto the fruit.
If you're using mechanical harvesters or shakers, dial back shaker force or speed. Hard shaking on saturated soil can throw fruit past the nets and into mud. On waterlogged ground, trunk shaking can also put extra strain on the base of the tree. Use only the amount of force needed to remove fruit cleanly. For hand-picking, soft rakes or combs with smooth teeth help cut bruising.
Use Ventilated Crates and Move Fruit Out of the Field Quickly
Once fruit is off the tree, shallow, ventilated plastic crates are the best choice. The vents help air move through the fruit and cut heat buildup. Fill crates no deeper than 10 to 12 inches and don't stack fruit above the rim.
Set crates on pallets, firm headlands, or another dry surface. Never place them straight on wet soil or in wheel ruts. Move full crates out of the block within 30 to 60 minutes. If conditions are hot or humid, move even faster.
Container choice matters because wet fruit bruises and heats up fast.
Harvest Container Comparison Table
| Container type | Advantages | Disadvantages | Wet-harvest recommendation |
|---|---|---|---|
| Ventilated plastic crates | Promotes airflow; reduces moisture buildup; easy to stage and transport | Less capacity than bulk bins | Use |
| Solid bins | Higher fruit capacity | Traps heat and moisture; increases compaction risk | Avoid in wet conditions |
| Bags | Portable and lightweight | Restricts airflow; traps moisture; bruises fruit | Avoid |
Stage full crates on a dry, shaded surface. Once fruit is staged, the next priority is fast milling and lot tracking.
Step 4: Reduce Transport and Milling Delays and Monitor Oil Quality
Once fruit is staged in ventilated crates, get it to the mill right away. Wet lots spoil sooner, so they need to stay separate from clean fruit. From the moment crates leave the orchard, the focus shifts to time and traceability.
Mill as Quickly as Possible and Track Each Lot
Process rain-affected fruit as soon as possible. Treat it as high risk and keep it separate from clean fruit from the moment it leaves the orchard.
Label every lot before it leaves the orchard. Use exposure-based labels - Dry/Clean, Pooled Water Only, or Direct Flood Contact - and record the block, exposure time, and field conditions. Then carry those same lot labels all the way through milling. That makes it much easier to tie quality shifts back to a specific block and keep higher-risk fruit away from clean lots.
Once lots are separated, the next safeguard is a clean mill line.
Clean Equipment and Record Oil Quality Changes
Before processing wetter lots, clean and sanitize the crusher, malaxer, and all contact surfaces before wetter lots run. If equipment has touched wet or flooded fruit, it can move spoilage microbes into the next lot.
Wet fruit can shift flavor and defect risk fast, so track each lot on its own. After milling, record aroma, bitterness, pungency, and any off-notes by lot. Keep those notes so you can compare how each lot performed after rain.
Conclusion: Key Post-Rain Harvest Priorities at a Glance
Move fast, keep wet lots separate, and clean equipment before the next lot. Speed and segregation protect oil quality after rain.
FAQs
How long can wet olives wait before milling?
Wet olives can wait up to 48 hours before milling.
That said, the best move is to get them from the tree to the mill the next day, or at least within that 48-hour window, to help keep quality in good shape.
Can muddy olives still make extra virgin olive oil?
Yes. Muddy olives can still be used to make extra virgin olive oil if they’re cleaned and handled the right way.
That said, too much mud or soil can hurt oil quality. It may also mean more processing is needed to keep the oil pure.
What should I do with olives that touched floodwater?
Olives that touched floodwater should be treated as contaminated and not safe for human consumption.
Throw away any olives that came into contact with floodwater. Don’t try to wash, cook, salvage, or process them. Standard cleaning methods can’t reliably remove harmful contaminants.