

How to Sun-Dry Tomatoes with Olive Oil
Sun-drying tomatoes and preserving them in olive oil is a simple way to enjoy their intense flavor year-round. By removing most of their water, the natural sweetness and savory notes are concentrated. Here's a quick overview of the process:
- Tomato Selection: Use Roma, plum, or cherry tomatoes for best results due to their low moisture and dense flesh.
- Drying Methods: Choose between sun-drying (1–14 days), oven-drying (4–24 hours at 120–225°F), or using a dehydrator (5–20 hours at 135–160°F).
- Preservation: Store dried tomatoes in high-quality extra virgin olive oil, like Big Horn Olive Oil, for added flavor and extended shelf life.
- Storage: Refrigerate for up to 2 months or freeze for up to 12 months.
This method not only preserves tomatoes but also creates a flavorful oil perfect for dressings and marinades.
Ingredients and Equipment You'll Need
Ingredients for Sun-Drying
When it comes to sun-drying, Roma or plum tomatoes are your best bet. Their thick walls, dense flesh, and low moisture content make them perfect for drying quickly and evenly. If you want something even more tailored for this process, try Principe Borghese, an Italian heirloom variety that's ideal for sun-drying. It combines the hearty texture of paste tomatoes with the small, manageable size of cherry tomatoes. Other good options include cherry, grape, and Campari tomatoes, especially if you're aiming for smaller, bite-sized results.
For seasoning, start with coarse sea salt or kosher salt to draw out moisture and intensify flavor. You can also add a touch of personality with extras like a pinch of sugar, garlic powder, Italian seasoning, or red pepper flakes. If you're feeling adventurous, include fresh garlic cloves, dried herbs like oregano, basil, or thyme, and a splash of red wine vinegar for added depth.
When it comes to preserving your tomatoes, go for a high-quality extra virgin olive oil. Something like Big Horn Olive Oil's Picual or Coratina EVOO works beautifully, enhancing the natural sweetness of the tomatoes while keeping them fresh.
Equipment
To get started, you’ll need a few basic tools: a colander, cutting board, chef’s knife, and paring knife. For the drying process, an electric dehydrator is a great investment - basic models cost around $50. Look for one with metal racks and side-mounted fans for even drying. If you don’t have a dehydrator, you can use rimmed baking sheets lined with lightly oiled parchment paper.
Keep an oven thermometer handy to ensure the temperature stays between 140°F and 150°F. If your oven doesn’t go below 200°F, you’ll need to stick with alternative methods like the dehydrator or sun-drying.
For storage, sterilize mason jars with tight-fitting lids. A wooden spoon is useful for releasing air bubbles when you’re layering the tomatoes in oil. If you’re using a dehydrator, consider adding fruit leather sheets or tin foil at the bottom to catch any drips during the initial drying phase. These small steps can make the process smoother and mess-free.
How to Prepare the Tomatoes for Drying
Washing and Cutting
Start by washing your tomatoes in cool water, then drying them completely with a clean towel. Any leftover moisture can slow down the drying process. Remove the stems and any small green cores from the tops of the tomatoes.
For cherry or grape tomatoes, slice them in half lengthwise. If you're using Roma or plum tomatoes, cut them in half or into quarters - this increases the surface area, helping them dry faster and stay firm. When working with large tomatoes, aim for uniform slices about 1/4 inch thick to ensure they dry evenly.
To save time, remove the seeds and pulp from the tomatoes. This step can significantly cut down on the overall drying time. Culinary expert Nicole McLaughlin emphasizes:
"The goal is to get rid of all the moisture you can... so it's best to start with a not-so-juicy tomato variety (like Romas)".
For clean, precise cuts, use a serrated knife. Once your tomatoes are prepped, you're ready to season them for both flavor and optimal drying.
Seasoning the Tomatoes
Sprinkle coarse sea salt or kosher salt on the cut sides of the tomatoes to help draw out moisture. Since drying removes up to 90% of the water content, any seasonings added now will become highly concentrated in the final product. Recipe developer Allyson Letal sums it up perfectly:
"Tomatoes need salt. If I ever write a cookbook that will be the title".
Feel free to add other seasonings like black pepper, garlic powder, Italian herbs, or red pepper flakes, but be cautious - too much can lead to overpowering flavors. Some prefer to season after drying to maintain a more balanced taste. If you plan to store the dried tomatoes in olive oil later, stick to dried herbs instead of fresh ones. Using fresh garlic or herbs introduces the risk of bacterial growth and requires refrigeration, with a shelf life of just four days.
Sun-dried tomatoes in olive oil: how to make a summer classic at home
3 Methods for Drying Tomatoes
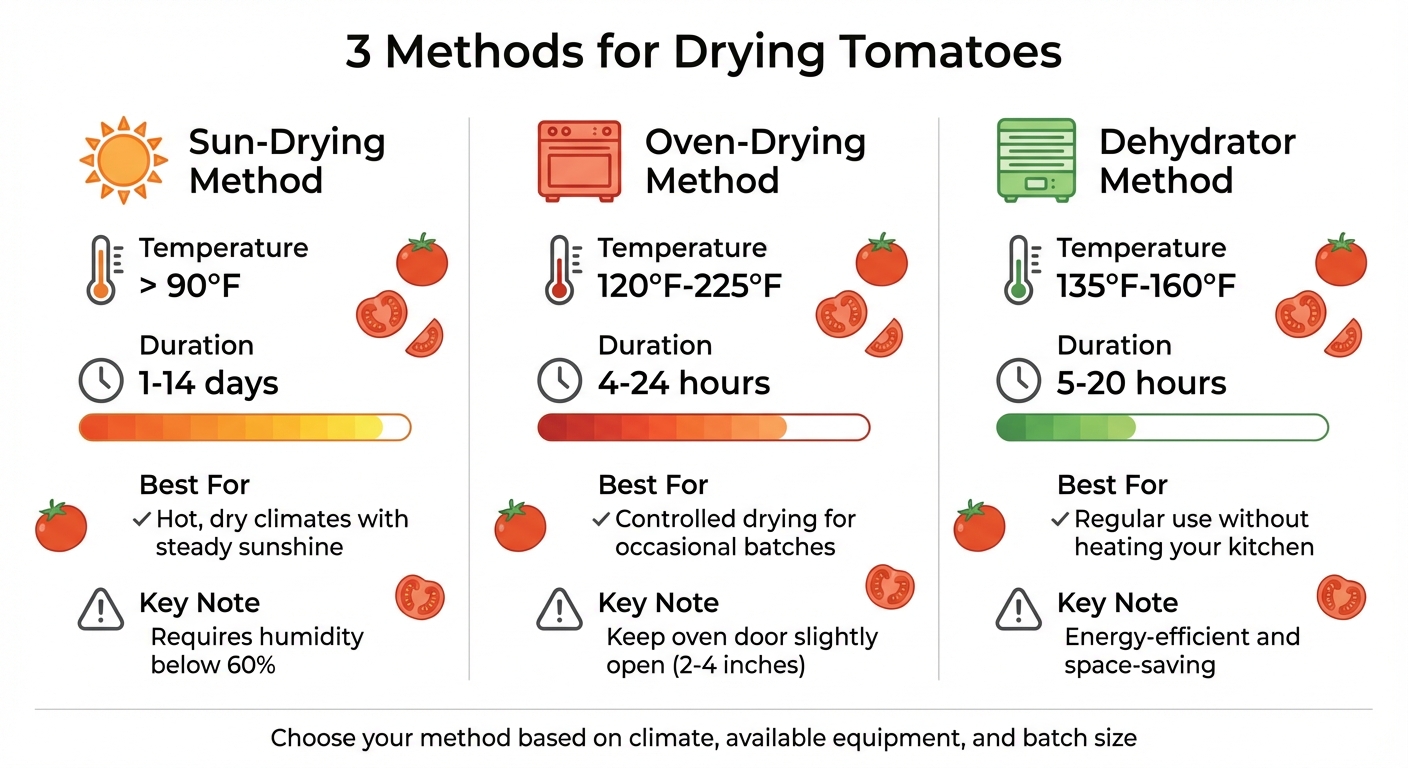
3 Methods for Drying Tomatoes: Temperature, Time & Best Use Comparison
Here are three ways to dry tomatoes, each suited to different needs based on your environment, tools, and time.
Sun-Drying Method
Sun-drying is a time-honored technique, ideal for regions with hot, dry weather - think temperatures above 90°F and humidity levels below 60%. Start by setting up a raised screen to allow airflow. Place your tomato halves cut-side up on the screen and cover them with cheesecloth to keep out pests and debris while maintaining ventilation. Depending on the weather, drying can take anywhere from 1 day to 2 weeks.
An important step? Bring the tomatoes inside every evening. As Charlotte P. Brennand of Utah State University Extension advises:
"sun drying demands a rainless season of bright sunshine and temperatures above 98°F coinciding with the period of product maturity".
Humidity increases at night, which can cause the tomatoes to absorb moisture again, raising the risk of mold. If weather conditions aren’t ideal, the oven-drying method might be a better option.
Oven-Drying Method
Oven-drying gives you precise control over temperature and timing, with the process lasting between 4 and 24 hours. Preheat your oven to anywhere from 120°F to 225°F. Lower temperatures may help retain nutrients but will extend the drying time. Line baking sheets with parchment paper or silicone mats - avoid aluminum foil, as it can react with the tomatoes' acidity. Place the tomato halves cut-side up on the sheets.
If your oven doesn’t have a convection setting, keep the door slightly open (2–4 inches) and use a fan to improve airflow and remove moisture. Check on the tomatoes occasionally to release trapped moisture. One downside? Running the oven for hours can make your kitchen uncomfortably warm, especially in summer.
Dehydrator Method
Using a dehydrator is a convenient way to dry tomatoes without heating up your kitchen. Set the dehydrator to a temperature between 135°F and 160°F. Arrange the tomato halves cut-side up to ensure juices don’t drip away. Drying time varies from 5 to 20 hours, depending on the size and thickness of the slices. For even results, flip the slices halfway through.
Properly dehydrated tomatoes should feel dry and make a slight crackling sound when dropped. Dehydrators are not only energy-efficient but can also be placed in a garage or outdoor area to save indoor space.
| Method | Temperature | Duration | Best For |
|---|---|---|---|
| Sun-Drying | Above 90°F | 1–14 days | Hot, dry climates with steady sunshine |
| Oven-Drying | 120°F–225°F | 4–24 hours | Controlled drying for occasional batches |
| Dehydrator | 135°F–160°F | 5–20 hours | Regular use without heating your kitchen |
sbb-itb-4066b8e
How to Preserve Dried Tomatoes in Olive Oil
Preparing the Jars
Start by choosing clean, pint-sized glass jars with tight-fitting lids. If you plan to freeze some of your preserved tomatoes, make sure the jars are labeled as "Freezer Safe".
Before packing, dip each dried tomato into red wine vinegar poured into a small bowl. Shake off any excess liquid before placing them in the jars. This step is essential for ensuring food safety. As Steve, a contributor on GardenWeb, points out:
"The vinegar treatment is the difference between a good dried tomato and a great one. It is also important from a food safety standpoint, as it acidifies the oil and discourages growth of bacteria and mold".
Once your jars are clean and your tomatoes are prepped with vinegar, you're ready to begin the layering process.
Layering and Filling the Jars
To start, arrange the vinegar-dipped tomatoes in the jars. Layer them carefully, adding aromatics like garlic cloves, black peppercorns, and capers, along with herbs such as thyme, oregano, rosemary, or basil between each layer. As you build up the layers, drizzle Big Horn Olive Oil's Ultra Premium EVOO periodically to keep everything well-packed. The flavor of the olive oil is crucial here - since drying intensifies the tomatoes' flavors, any taste in the oil will also become more pronounced during storage.
Use a spatula to press the tomatoes down and remove any air bubbles. Once the jar is full, pour in enough olive oil to completely cover the top layer of tomatoes - exposure to air can lead to mold growth. Before sealing, clean and dry the rim of the jar to ensure a secure closure. Keep in mind that the olive oil will solidify when refrigerated, but it will return to its liquid state at room temperature without affecting its quality.
Storage and Usage Tips
How to Store Preserved Tomatoes
To keep your preserved tomatoes safe and fresh, store sealed jars in the refrigerator. While older methods might suggest room temperature storage for unseasoned, fully dried tomatoes, modern food safety guidelines recommend refrigeration to slow down spoilage and prevent bacterial growth. Properly refrigerated, preserved tomatoes can last up to 2 months if they contain dried herbs, or up to 6 months if they’re fully dried and stored in oil.
Always check for mold before use - if you spot any, it’s best to discard the jar. If the oil in the jar solidifies and turns cloudy in the fridge, don’t worry. Simply leave the jar at room temperature until the oil liquefies again. For longer storage, you can freeze oil-packed tomatoes in freezer-safe jars, where they’ll keep for up to 12 months.
"Dried tomatoes-in-oil mixtures with [fresh] garlic and/or herbs MUST be refrigerated and used within 4 days or frozen for long-term storage." - Oregon State Extension Service
Now that you know how to store them, let’s dive into creative ways to use these flavorful preserved tomatoes.
Ways to Use Preserved Tomatoes
Preserved tomatoes bring bold, concentrated flavor to a variety of dishes. Add them to pasta, risotto, salads, omelets, or pizza for an instant upgrade. They also make a delicious base for vinaigrettes, marinades, or dips. For something unique, blend them into pesto or tapenade, stuff them into chicken breasts or portobello mushrooms, or include them on an antipasto platter. They’re even perfect for enhancing tomato basil soup.
Don’t forget about the infused olive oil left in the jar! This oil, packed with tomato and herb flavors, is perfect for making vinaigrettes, marinades, or as a dipping oil for fresh, crusty bread.
For the best results, try using a high-quality extra virgin olive oil, such as Big Horn Olive Oil, to elevate both the flavor and quality of your preserved tomatoes.
Conclusion
Turning your garden tomatoes into sun-dried treasures preserved in olive oil is a simple way to capture their peak flavor and enjoy them for months. By choosing varieties like Roma or San Marzano, drying them until they’re perfectly leathery, and storing them in high-quality extra virgin olive oil, you create a pantry staple that adds depth to dishes like pasta, salads, and more.
Drying concentrates the tomatoes’ natural sweetness and nutrients, while the olive oil not only preserves them but also becomes a deliciously infused oil. Using a premium option like Big Horn Olive Oil's Ultra Premium EVOO takes this process up a notch, giving you a flavorful oil that’s perfect for dressings, marinades, or even dipping fresh bread.
Whether you prefer sun-drying, oven-drying, or using a dehydrator, the result is a batch of intensely flavored tomatoes that can adapt to your cooking style and environment. This method’s charm lies in its simplicity and the rich, complex flavors it delivers.
With proper refrigeration, these preserved tomatoes will last for months, bringing a burst of summer to your meals - even in the coldest months. It’s a straightforward way to savor the season year-round, making it a must-try preservation technique for any home cook.
FAQs
What are the ideal conditions for sun-drying tomatoes and preserving them in olive oil?
To dry tomatoes in the sun properly, you’ll need warm, sunny days with low humidity and good airflow. Temperatures should ideally stay between 85°F and 95°F, with a minimum of 6–10 hours of direct sunlight each day. Humidity levels below 60% are key, as dry air helps pull moisture out of the tomatoes efficiently.
Start by slicing your tomatoes into 1/4 to 1/2-inch thick pieces and removing most of the seeds. Arrange them skin-side up on a clean mesh screen or baking sheet, leaving space between each slice for air circulation. Turn the slices daily to ensure they dry evenly. To protect them from insects while still allowing airflow, loosely cover the tomatoes with cheesecloth. Under these ideal conditions, the tomatoes should dry in about 2–4 days, reaching a leathery yet flexible texture with no visible moisture remaining.
Once they’re fully dried, store the tomatoes in a sterilized jar and immerse them in high-quality extra-virgin olive oil, such as Big Horn Olive Oil, to lock in their flavor and keep them fresh for months.
How does olive oil improve the flavor and shelf life of sun-dried tomatoes?
Using olive oil brings out the tangy and savory notes of sun-dried tomatoes by layering in a rich, fruity depth. Submerging the tomatoes completely in olive oil not only enhances their flavor but also acts as a natural preservative. This method creates an airtight seal, helping to maintain their texture, reduce oxidation, and keep them fresher for longer.
To elevate the taste and ensure top-notch freshness, opt for high-quality olive oil, like Ultra Premium Extra Virgin Olive Oil. Its bold flavor profile pairs beautifully with the intensity of sun-dried tomatoes.
Can I add fresh herbs when preserving sun-dried tomatoes in olive oil?
While fresh herbs can add a burst of flavor, they aren't the best choice for storing sun-dried tomatoes in olive oil for extended periods. Fresh herbs contain moisture, which can lead to spoilage or even bacterial growth. To keep things safe and delicious, opt for dried herbs instead - they pack plenty of flavor without the added risk. If you decide to use fresh herbs, make sure to refrigerate the mixture and finish it within a few days.