

Ultimate Guide to Mediterranean Clay Cookware
Clay cookware still earns its place in a U.S. kitchen because it cooks slowly, holds moisture, and helps food stay tender. If I want better beans, stews, braises, or roasted vegetables, clay often does a better job than metal at low, steady heat.
Here’s the short version:
- Clay heats slowly and evenly, which helps cut down hot spots.
- Unglazed clay is porous, so it can release steam during cooking after a 15 to 45 minute soak.
- Glazed clay is simpler to clean and does not need soaking before each use.
- Tagines are best for moist stews, cazuelas work well for dishes that need some reduction, and ollas suit soups, stews, and beans.
- The main risk is thermal shock: moving clay from cold to hot, or hot to cold, too fast.
- For first use, many unglazed pots need a long soak, often about 12 hours, plus a low-heat first cook.
- For cleanup, I skip soap on unglazed clay, dry it all the way, and store it with the lid slightly open.
- If I buy a glazed piece, I check that it is lead-free.
How to Prepare TerraCotta Cookware with Special Guest MOM | طجين | Seal Your Clay Pots | Tagine
sbb-itb-4066b8e
Quick comparison
| Cookware | Best for | Moisture level | Prep | Cleanup | Main caution |
|---|---|---|---|---|---|
| Tagine | Chicken, lamb, vegetable stews | High | Low, slow heat | Hand wash | Avoid sudden temp changes |
| Cazuela | Garlic shrimp, baked eggs, rice | Medium | Often easiest to start with | Simple if glazed | Use low heat on stovetop |
| Olla / bean pot | Beans, soups, long-simmered stews | High | Slow start | Moderate | Dry well before storage |
| Unglazed clay pot | Beans, braises, rustic stews | Very high | Soak before cooking | No soap | Can crack from thermal shock |
| Glazed clay pot | Daily cooking with less upkeep | Medium to high | No soak needed | Easiest | Check for lead-free glaze |
One fact stands out: clay cooking goes back more than 10,000 years. That long run is not about nostalgia. It’s about a pot that still works.
If you want clay cookware without the guesswork, this guide comes down to three things: pick the right vessel, heat it slowly, and dry it well after cleaning.
The Origins of Mediterranean Clay Cookware and Its Place in Regional Cooking
Clay cookware has been part of Mediterranean cooking for millennia. Terracotta pots have been used for culinary purposes for over 10,000 years. That kind of staying power says a lot. These pots lasted because they worked.
A Brief History of Clay Pot Cooking in the Mediterranean
In the Mediterranean, clay pot cooking goes back a very long way. The practice of soaking unglazed clay pots before cooking dates to at least the Etruscans in the 1st century BC. Later, the Romans took up those methods and vessels and turned them into what became known as the "Roman pot", an early form of modern earthenware.
For much of that history, clay was the everyday cooking vessel. Then metal cookware became more common. Even so, clay kept its place, especially for slow, moist cooking. That made it a strong match for dishes that need steady, gentle heat, like slow-cooked beans, braised meats, and vegetable stews. Over time, those habits shaped the vessels still seen across the region.
How Clay Cooking Fits the Mediterranean Diet
Mediterranean home cooking leans on ingredients that do well with low, slow heat: beans, lentils, tougher cuts of meat, tomatoes, grains, and olive oil. Clay cookware fits that style naturally. When soaked, unglazed clay releases moisture bit by bit as steam, which helps keep food tender.
Some cooks also like clay for how it can mellow the sharp edge of acidic ingredients like tomatoes and citrus. It’s part of why these pots suit so many staple dishes from the region. The pot doesn’t just hold the food. It helps shape the final texture and flavor.
"Cooking in a clay tagine, very gently over a brazier... diffuses the heat all around the pot and produces, at the end, a reduced sauce sizzling in its fat." - Claudia Roden, Author of Arabesque: A Taste of Morocco, Turkey & Lebanon
Those cooking habits helped shape regional vessels, each with its own form and use.
Types of Mediterranean Clay Cookware and What Each One Is Used For
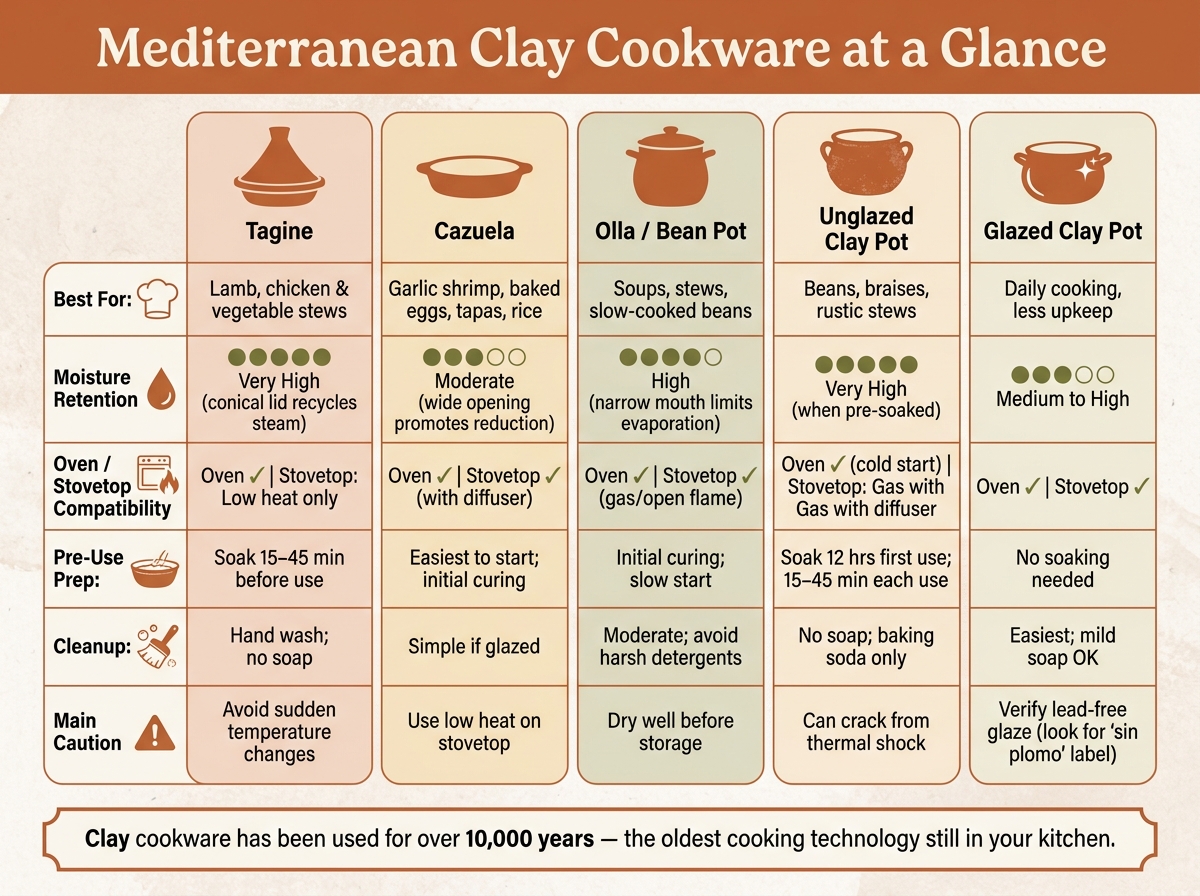
Mediterranean Clay Cookware: Tagine vs Cazuela vs Olla vs Clay Pots Compared
Mediterranean cooking gave us a few clay vessels, and each one handles heat and moisture a little differently. That matters more than it might seem. The shape of the pot affects how much steam stays in, how much liquid cooks off, and how the dish finishes.
If you're just getting started, it helps to focus on three main forms: tagine, cazuela, and olla.
Unglazed Pots, Tagines, and Cazuelas: Best Uses for Each
The tagine has a shallow, wide base with a tall cone-shaped lid. As food cooks, steam rises into the lid, cools, and falls back onto the ingredients. That cycle keeps the dish moist without much added liquid. It's a great fit for slow-cooked lamb, chicken, or vegetables when you want a deep, concentrated sauce.
The cazuela is low and open. Because more surface area is exposed, some liquid cooks off as the dish heats. That makes it a good choice for recipes that need a bit of reduction, like garlic shrimp (gambas al ajillo), baked rice, baked eggs, or small tapas-style dishes.
The olla is taller and rounder, with a narrower opening. That shape holds in more moisture during long cooking times, so it's well suited for hearty stews and soups that simmer for hours. The pignatta, also called a bean pot, is vase-shaped and made for slow, steady cooking of beans and other legumes.
"Cooking beans in clay is almost magical. The slow, even heat and natural clay are considered the best way to cook beans." - Steve Sando, Founder of Rancho Gordo
For a first piece, a cazuela is often the easiest place to start. It works for a lot of day-to-day cooking and can move between the stovetop and oven with less fuss.
Glazed vs. Unglazed Clay: How to Choose
Unglazed clay is porous. It takes in water, then gives off that moisture as steam when heated. That helps create a humid cooking space inside the pot, which keeps food tender. There is a catch: the pot usually needs to be soaked for 15 to 45 minutes before each use to help prevent cracking. It also shouldn't be cleaned with dish soap, since the surface can absorb it and pass that flavor into later meals.
Glazed clay is sealed. The glaze blocks the pores, so the pot can hold liquid without leaking. It doesn't need soaking before every use, and cleanup is much simpler. It's also non-reactive, which means bold ingredients like garlic and spices are less likely to linger. For beginners, glazed clay is usually the easier option for both use and cleanup.
One more thing: if you're buying glazed cookware, check that the glaze is certified lead-free. That's especially important with more old-school Spanish or Mexican pieces. A label that says sin plomo means "without lead".
A simple way to think about it: choose unglazed clay if you want the old-school, moisture-rich cooking style. Choose glazed clay if you want easier cleanup and less maintenance.
Comparison Table: Vessel Types at a Glance
| Vessel | Ideal Dishes | Oven | Stovetop | Moisture Retention | Care Needs |
|---|---|---|---|---|---|
| Tagine | Lamb/chicken stews, moist vegetable braises | ✓ | Low stovetop heat | Very high (conical lid recycles steam) | Hand wash; avoid thermal shock |
| Cazuela | Garlic shrimp, baked eggs, tapas, baked rice | ✓ | ✓ (with diffuser) | Moderate (wide opening promotes reduction) | Initial curing; avoid thermal shock |
| Olla / Bean Pot | Stews, soups, slow-cooked beans | ✓ | ✓ (gas/open flame) | High (narrow mouth limits evaporation) | Initial curing; avoid harsh detergents |
| Unglazed Casserole | Rustic stews, beans, artisan breads | ✓ (cold start) | Gas (with diffuser) | Very high (if pre-soaked) | Soak before each use; initial curing required |
How to Use Mediterranean Clay Cookware Safely
Once you’ve picked the right pot, heat control is the big thing. Most problems happen when clay goes from one temperature extreme to another too fast. So don’t move a cold pot straight onto a hot burner or into a hot oven. Clay cookware needs a slow start because it heats up gradually and holds both heat and moisture over time.
First-Use Prep: Rinsing, Soaking, and Seasoning
Start with the first use, then carry those same habits into day-to-day cooking.
For a first use, soak unglazed pots in room-temperature water for at least 12 hours. Glazed pieces don’t need soaking, but rinsing them with warm water before that first cook is still a smart step.
After soaking, let the pot air-dry fully until it feels dry to the touch. Then condition it by simmering water with a handful of rice over low heat for 30 minutes. After that, let the pot cool all the way before you pour out the liquid.
There’s also a more old-school method: rub the inside with a cut garlic clove and a light coat of olive oil, then bake it with water at a low temperature. For that first seasoning bake, set the oven to about 300°F (150°C) and place the pot inside before turning the oven on. In plain English: always begin with a cold oven.
Managing Heat on Ovens and Stovetops
"With a clay pot, you start the heat LOW, then gradually increase the temperature over the course of 5 minutes or so to where you want it." - Bram Cookware
For oven cooking, put the pot into a cold oven first and then switch the oven on. That way, the pot and oven heat up together, which helps cut the risk of thermal shock. Never put a room-temperature clay pot into a preheated oven.
On a gas stove, begin with the lowest flame and keep it at medium-low or below. On electric coil stoves, use a heat diffuser. For glass-top stoves, only use clay cookware if the maker says it’s okay. And standard clay cookware should not go on induction unless it has an induction-ready base.
Thermal shock can also happen mid-cook, not just at the start. Don’t pour cold liquid into a hot clay pot. Warm stock or wine first. And once the pot comes off the heat, place it on a wooden trivet or a thick towel, not on a cold countertop or metal surface.
Safety Table: Common Risks, Causes, and How to Prevent Them
The pattern here is simple: sudden temperature swings are the enemy.
| Risk | Likely Cause | Prevention |
|---|---|---|
| Cracking | Sudden temperature change (thermal shock) | Start in a cold oven; heat stovetop slowly; never place a hot pot on a cold surface |
| Scorching | Heating an empty pot or using high heat too fast | Add food or liquid before increasing heat; stay with low to medium settings |
| Mold Growth | Storing while still damp or with lid sealed tight | Let it air-dry fully before storing; keep the lid ajar or off |
| Soap Taint | Detergent residue in unglazed clay | Clean with hot water and baking soda only; avoid soap on unglazed pieces |
| Staining | Acidic foods absorbed by clay | Use glazed pots for acidic dishes; soak unglazed pots in a baking soda solution to help lift stains |
Cleaning, Long-Term Care, and Pairing Clay Cookware with Mediterranean Flavors
Routine Cleaning, Deep Cleaning, and Storage
Once cooking is done, care shifts to cleaning, drying, and storage. That matters because clay’s porous surface is part of what helps it hold heat evenly and keep food moist.
Let the pot cool all the way before you wash it.
Use mild soap only on glazed pots. If the clay is unglazed, skip soap.
If food is stuck on, soak the pot in warm water for 15–20 minutes. Then scrub with baking soda. For odors, soak it overnight with 2 tablespoons of baking soda per quart of water.
Every few months, re-season the pot with a 30-minute soak in a 1:3 white vinegar-and-water mix.
Dry it well with a towel, then let it air-dry before putting it away. If you live in a humid area, set the pot on the stovetop at the lowest heat for a few minutes to drive off any leftover moisture.
For storage, leave the lid off or slightly ajar. A paper towel between the lid and rim helps air move through the pot.
If mold shows up, scrub it off with a baking soda paste, rinse well, and dry the pot in direct sunlight or on the stovetop at the lowest setting until the rim feels warm to the touch.
Care Table: Cleaning Routines, Storage Conditions, and When to Replace
These habits help protect the porous surface that makes clay so good at holding heat and moisture.
| Phase | What to Do | Warning Signs to Watch |
|---|---|---|
| After Each Use | Cool fully; rinse with hot water; scrub with a soft brush or baking soda paste; avoid soap on unglazed clay. | Hairline cracks - monitor closely; they can sometimes be repaired with food-safe ceramic adhesive. |
| Deep Cleaning | Soak overnight in hot water with baking soda, or use a 30-minute white vinegar and water soak every few months. | Spreading or deep cracks that leak liquid - replace immediately. |
| Drying | Towel-dry, then air-dry fully; in humid conditions, dry on the stovetop at the lowest heat setting. | Persistent mold that returns after deep cleaning and sun-drying - replace the pot. |
| Storage | Store fully dry, with the lid ajar or off in a ventilated area; tuck a paper towel between the lid and pot. | Interior glaze chipping or flaking on the cooking surface - replace. |
| Occasional Maintenance | Wipe a very thin coat of olive oil inside only if food starts sticking. | A dull thud when tapped - inspect for hidden cracks. |
How Olive Oil Works with Clay-Cooked Mediterranean Dishes
Clay cookware cooks with gentle, even heat and creates a moist, steam-rich cooking space. In many cases, that means you need little to no added oil to keep food from burning.
That’s why olive oil often works best at the end, not at the start.
A drizzle of high-quality extra virgin olive oil can add brightness and depth to clay-cooked legumes or vegetables. Clay also helps protect the delicate flavor of premium extra virgin olive oil, so the finish tastes clean instead of tired or overcooked.
A small splash of balsamic vinegar can also work well on stews and legumes.
FAQs
Which clay pot is best for beginners?
For beginners, the cazuela is often the best place to start. It’s a wide, shallow clay pot that can handle a lot: sautéing, poaching, and baking, all in one vessel.
If you want something simple for day-to-day cooking, a glazed clay pot is a smart pick. It doesn’t need soaking before use, and cleanup is easier since you can wash it with soap and water.
Can I use clay cookware on my stovetop?
Yes - but you need to treat it with care to lower the risk of thermal shock and cracking.
Start with low heat, then bring the temperature up slowly. Clay needs time to warm up, and sudden heat can cause damage.
It also helps to use a heat diffuser. That spreads heat more evenly and shields the pot from direct contact with the burner.
A few more things matter here:
- Avoid induction cooktops unless the clay pot is made for them or you use a compatible adapter plate.
- Season the pot before first use.
Clay cookware can work well on the stovetop, but it doesn't like being rushed.
How do I know if a clay pot is safe to buy?
Choose clay pots that are clearly labeled food-safe or lead-free and made for cooking. Good options include raw, unglazed, or kiln-fired vessels.
Skip decorative, painted, or glazed pots. Those can contain harmful chemicals or lead. If you're not sure about a pot, use a lead-testing kit or buy from reputable sellers or local artisans who follow modern health and safety standards.