

How Greeks Preserve Olives Through Fermentation
You can preserve olives with just four controls: salt, acid, temperature, and keeping every olive under the brine. In most home batches, Greeks use a 6% to 10% brine, keep jars around 68°F to 77°F, and wait 3 to 12 months depending on the olive type and prep.
Here’s the short version:
- Fresh olives are too bitter to eat because of oleuropein.
- Green olives are usually cut or cracked, then soaked in water for 10 to 12 days before brining.
- Ripe black olives can often go straight into brine, but they usually take longer.
- A common home mix is 3.5 oz salt per 1 quart water.
- The brine should drop below pH 4.30 within 15 days.
- If olives sit above the liquid, mold and spoilage can start.
- Good olives stay firm and smell clean and tangy.
- After curing, olives are moved to clean jars with new brine and sometimes a thin layer of olive oil on top.
If I wanted the process in one line, I’d say this: prep the olives by type, brine them at the right salt level, keep them submerged for months, and store them cool once the taste and acidity settle.
How to Ferment Fresh Olives at Home | Complete Beginner Guide Step by Step
sbb-itb-4066b8e
Quick Comparison
| Method | Olive type | Prep | Time | Result |
|---|---|---|---|---|
| Brine-cured whole black olives | Ripe black olives | Sort, wash, brine | Several months | Milder, fruitier taste |
| Brine-cured green olives | Green olives | Cut/crack, soak 10–12 days, then brine | Months | Firmer, less bitter over time |
| Dry-salted olives | Throubes-style olives | Layer with coarse salt | About 1 month | Wrinkled texture, stronger taste |
Bottom line: if you keep the salt steady, the pH low, the temperature moderate, and the olives fully covered, Greek-style olive fermentation works in a U.S. home kitchen without much fuss.
Core Rules for Safe Greek-Style Fermentation
Before you pack olives, keep an eye on four things: salt concentration, acidity, temperature, and full submersion. Get those right, and fermentation has a much better chance of staying on track.
Brine strength, acidity, and temperature
A solid home starting point is 100 g of coarse salt per 1 liter of water, which gives you a 10% brine. Georgia Zerva-Boutsiani explains it this way:
"For about 1 kg of olives, mix 1 liter of lukewarm water with 100 g of coarse salt (i.e., salt equal to 10% of the water weight) in a deep bowl until the salt dissolves."
Salt helps hold back spoilage microorganisms while letting fermentation move in the right direction. If your olives start to soften early, use a stronger brine at the next adjustment.
During fermentation, keep the jar at 68°F to 77°F. The brine should fall below 4.30 within 15 days.
Keeping olives submerged and spotting problems early
Each olive needs to stay fully under the brine at all times. Once olives sit above the liquid, air can bring in unwanted molds and bacteria. A thin yeast film on the surface may not be a problem, but you should discard the batch if you notice fuzzy mold, a bad odor, or mushy olives.
Check the texture about once a month to catch spoilage early. Firm olives and a clean, tangy smell are good signs. Once those conditions are steady, you can move on to preparing the olives for brining.
How to Prepare Fresh Olives for Fermentation
Choosing the right olive variety and ripeness
With the brine rules set, it’s time to pick and prep the olives, a process rooted in the authentic flavor we value at Big Horn Olive Oil.
Start with a table olive variety that works well for brining, such as Kalamon, Amfissis, or Halkidiki. Ripeness matters more than many people think. It affects both curing time and taste.
Green olives are firmer and more bitter, so they usually need scoring or cracking first. Ripe black olives can go into brine whole, but they tend to cure more slowly.
Zerva-Boutsiani advises choosing olives that are uniform in size, firm, glossy, healthy, and free of bruises or insect damage.
For classic Kalamata-style olives, harvest when about three-quarters of the flesh has turned black.
Once you’ve chosen the fruit, move straight into sorting and prep.
Sorting, washing, soaking, and gathering equipment
Toss any bruised, soft, or moldy olives. One bad fruit can spoil the whole batch. It also helps to keep olives of similar size together, since they cure at about the same pace.
Rinse the sorted olives well in a colander under running water to wash off dust and debris.
For green olives, make 1 to 3 shallow lengthwise cuts, or crack them lightly if you want a softer texture. Then soak them in cold water for 10 to 12 days, changing the water every 1 to 2 days, until the bitterness fades. Ripe black olives can go straight into brine, though whole fruit takes longer to cure.
For containers, you can use:
- Glass jars
- Food-grade plastic buckets
- Ceramic crocks
All of these work well. If you’re using glass jars, sterilize them by boiling them in water for 10 minutes before use. Pick a container that can hold the olives and soak water without crowding, and have it ready before you mix the brine.
Step-by-Step Greek Brine Fermentation at Home
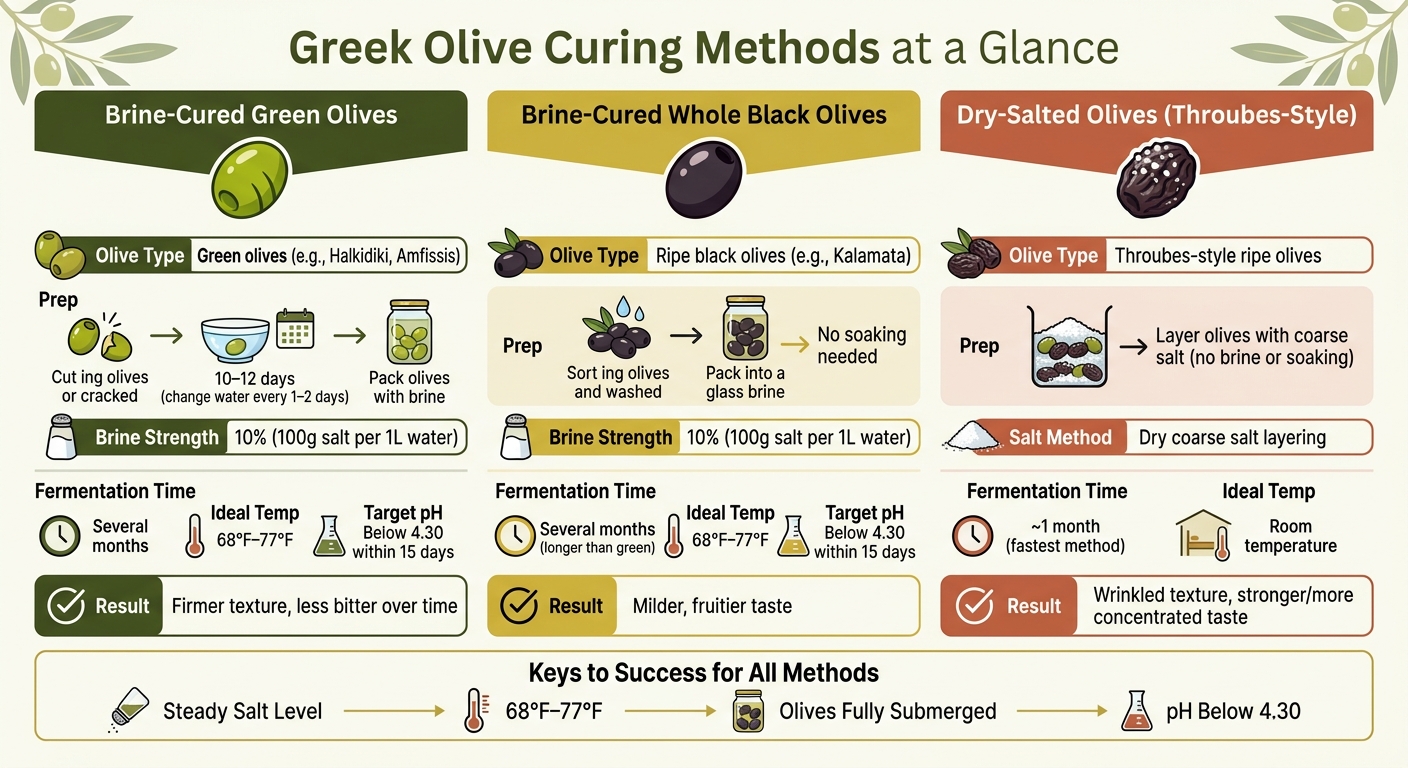
Greek Olive Curing Methods: Brine vs. Dry-Salt Comparison
How to mix the brine and pack the olives
With the olives cleaned and sorted, go straight to the brine.
Mix 3.5 oz of coarse salt into 1 quart of lukewarm water and stir until the salt dissolves. Then let the brine cool to room temperature before you pour it over the olives.
Pack the prepared olives snugly into a clean, food-grade container. Pour the cooled brine over them until every olive is fully covered. If you want extra flavor, add lemon slices, garlic, oregano, rosemary, or dried chili.
This part matters: the olives need to stay under the brine the whole time. Even a short stretch exposed to air can lead to mold or surface scum.
How long to ferment and when to adjust
Once the olives are packed, the active stage begins.
The first 10 days usually bring the strongest action, as lactic acid bacteria start acidifying the brine. After the first few weeks, taste the olives every 7 to 10 days. You’re looking for less bitterness and a texture that still has a bit of bite.
If the olives start softening too fast, make the brine a little stronger at the next adjustment. The full timing depends on the olive variety and can range from a few months to many months. Keep the container at room temperature, ideally between 68°F and 77°F.
Comparison of common Greek preservation methods
Greek olive curing methods can lead to very different results in flavor, texture, and timing.
- Ripe black olives go straight into brine and slowly take on a milder, fruitier taste over several months.
- Green olives need a 10–12 day water soak first to pull out bitterness before brine fermentation starts working.
- Dry-salted olives, like Throubes, skip brine altogether. They’re layered with coarse salt, which gives them a wrinkled texture and a more concentrated taste. They can be ready in about one month.
How to Finish, Store, and Serve Fermented Olives
Moving olives to clean jars for storage
Once fermentation is done, move the olives into storage jars right away. Greek-style batches are often ready after about 90 to 150 days, when acidity levels level off.
Use clean glass jars. Then cover the olives with fresh brine made at the same salt level and add a thin layer of olive oil on top to help keep air out. After that, store the jars in a cool pantry or cupboard. If your kitchen runs warm, or the olives still seem a bit active, put them in the refrigerator.
How to season and serve fermented olives
At this point, the olives are ready for simple Greek-style seasoning. You can add lemon slices, bay leaves, peppercorns, coriander seeds, or dried chili.
The storage liquid changes the flavor a bit:
- Olives kept in brine tend to taste saltier.
- Olives kept in oil and vinegar take on more vinegar flavor and taste tangier.
Right before serving, a drizzle of extra virgin olive oil gives them a richer finish.
Conclusion: Key steps for making Greek-style fermented olives
The main things are pretty simple: keep the olives fully submerged, hold the salt level steady, make sure acidity has stabilized, and store them in a cool, shaded spot.
FAQs
How do I know fermentation is working?
Fermentation is underway when lactic acid bacteria and yeasts convert the olives’ natural sugars into lactic acid.
You should see the pH drop steadily, ideally to about 4.0. The brine should also start to taste sour and smell fruity. Those signs mean the fermentation is active, which helps preserve the olives and cut down their natural bitterness.
What should I do if mold appears on the brine?
Mold on the surface of olive brine usually means contamination or poor fermentation conditions. If that happens, it’s best to throw the batch out. At that point, the fermentation has gone off track.
To help stop this from happening, start with clean equipment. Sterilize jars by washing them in hot, soapy water, rinsing them well, and then boiling them for 10 minutes before use.
Can I use table salt instead of coarse salt?
Yes - but measure by weight, not volume.
Here’s why: different salts have different densities. A kitchen scale helps you keep the right brine ratio, which is usually 1 part salt to 10 parts water.
For example, table salt is denser than coarse salt. So if you measure by volume, you can end up with too much salt or not enough. And that can throw off the brine and affect how well your olives keep.