

Tuna Preservation with Olive Oil
Olive oil helps tuna taste better, but it does not make it safe on the shelf. If I want to store tuna for a few days, I keep it in the fridge at 40°F or below. If I want shelf-stable jars, I use a pressure canner - not a water-bath canner.
Here’s the whole article in plain terms:
- Tuna is a low-acid food, so it can support botulism if handled the wrong way.
- Refrigerated tuna in olive oil is for short storage: about 3 to 10 days in some cases, and up to 1 to 2 weeks when kept cold and covered in oil.
- Pressure-canned tuna in olive oil is the home method for pantry storage.
- For canning, tuna is processed for 100 minutes in half-pint or pint jars at 10 to 11 psi, with pressure adjusted for altitude.
- For refrigerated tuna, the oil is usually kept around 160–180°F, and the fish should reach 165°F inside.
- Never store homemade, non-pressure-canned tuna in oil at room temperature.
- If a jar has a swollen lid, broken seal, bubbling, mold, slime, bad smell, or odd color, I throw it out without tasting.
Homemade Canned TUNA in Oil
sbb-itb-4066b8e
Quick comparison
| Method | Where I store it | How long it lasts | Main rule |
|---|---|---|---|
| Tuna poached in olive oil | Refrigerator | 1–2 weeks | Keep it cold and fully covered |
| Pressure-canned tuna in olive oil | Pantry | Up to 1 year for best quality | Use a pressure canner |
If I had to boil it down to one point, it’s this: oil improves texture and flavor, but safety comes from cold storage or pressure canning.
Prepare the Tuna, Oil, and Equipment
Start with fresh tuna, fresh oil, and clean tools. Before you cook anything, get the fish, oil, and gear ready.
Choose and Trim Fresh Tuna
Use the freshest tuna you can find. According to FDA seafood guidance, good tuna has firm flesh that springs back when pressed and smells mild, not fishy, sour, or ammonia-like. Albacore and yellowfin are common picks for home preservation because they have a mild taste and keep their texture well after cooking.
After that, trim the fish with care. Remove the dark center bloodline, skin, connective tissue, and any visible bones. Taking out the dark center section gives the tuna a milder taste and a cleaner look. Cut the tuna into even pieces so they cook at the same rate and fit snugly into jars.
Once the fish is trimmed, move right to the oil and equipment.
Use Extra Virgin Olive Oil for Flavor and Protection
Fresh extra virgin olive oil adds a clean taste and helps the tuna stay bright. If you want a fresh EVOO for this step, Big Horn Olive Oil offers ultra premium extra virgin olive oils sourced for freshness and quality. Use enough oil to fully surround the tuna pieces and remove air pockets, while still leaving the right headspace in the jar.
Add Aromatics Without Overcomplicating the Flavor
A little goes a long way here. Garlic, bay leaf, black peppercorns, lemon zest, thyme, or rosemary can all work. Pick one or two, not the whole shelf. The tuna and olive oil should do most of the talking. Aromatics should back them up, not steal the show.
Set out your equipment before you begin:
- Clean glass jars
- New lids
- A large pot or pressure canner, depending on your method
- An instant-read thermometer
Cook the tuna until the center reaches 165°F, then let it cool until the surface is dry before packing.
Keep the setup simple so the tuna stays the star.
Method 1 and Method 2: Refrigerated or Pressure-Canned Tuna in Olive Oil
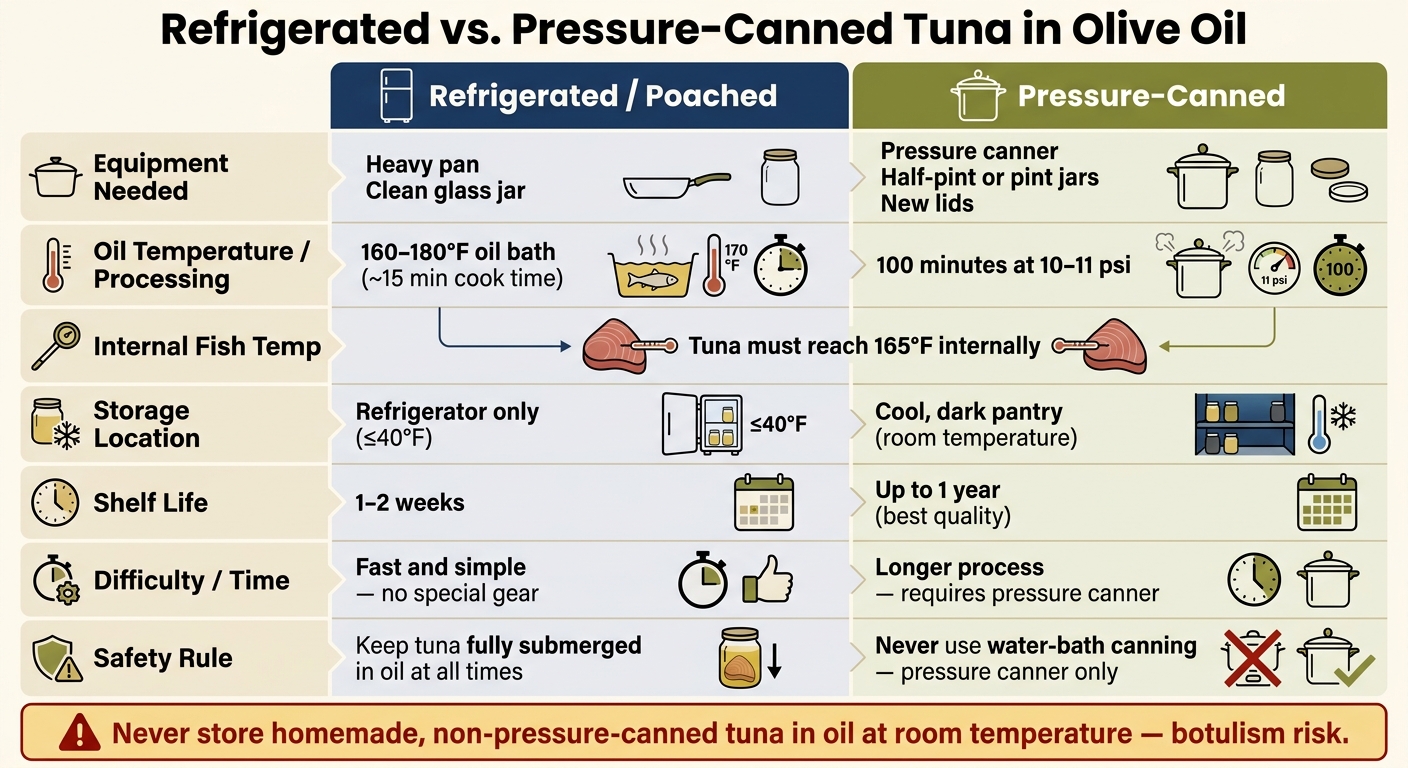
Refrigerated vs. Pressure-Canned Tuna in Olive Oil: Full Comparison
With the tuna ready, you have two paths: a fast refrigerated method or a pressure-canned method for pantry storage.
One rule is firm: water-bath canning is not safe for tuna in oil. If you want shelf-stable tuna at home, you need a pressure canner.
Olive-Oil Poached Tuna for Refrigerator Storage
This method is simple and doesn't call for special gear. Heat the olive oil to about 160–180°F. Add the tuna pieces and make sure they're fully submerged. Cook until the center turns opaque, which usually takes about 15 minutes, depending on thickness.
When the tuna is done, remove the pan from the heat and let it cool. Pack the tuna into a clean glass jar, then pour the oil over the fish until it's fully covered. Seal the jar and refrigerate it right away. Use it within 1 to 2 weeks.
The tuna needs to stay fully submerged in oil and kept cold in the refrigerator.
If you want the same rich flavor with pantry storage, move to pressure canning.
Pressure-Canned Tuna in Olive Oil for Pantry Storage
Pressure canning takes more time and a bit more gear, but it gives you tuna you can store for the long haul.
- Pack the jars: Fill half-pint or pint jars with trimmed tuna, leaving 1 inch of headspace. Add enough olive oil to cover the tuna without cutting into that 1-inch headspace. Remove air bubbles by sliding a thin spatula or bubble remover around the inside edge of the jar. Wipe the rims clean and apply the lids.
- Vent and pressurize the canner: Put the jars in the pressure canner with the right amount of water. Lock the lid and let steam vent in a steady stream for a full 10 minutes before closing the vent or adding the weight.
- Process at the right pressure for your altitude: At up to 1,000 ft, process for 100 minutes at 11 psi in a dial-gauge canner or 10 psi in a weighted-gauge canner. Above 1,000 ft, increase the pressure based on your canner's tested guidance. After processing, turn off the heat and let the canner depressurize on its own. Don't rush it.
Refrigerated vs. Pressure-Canned Tuna in Oil: Side-by-Side Comparison
Use this quick table to line up the method with your storage plan.
| Refrigerated (Poached) | Pressure-Canned | |
|---|---|---|
| Equipment needed | Heavy pan, clean jar | Pressure canner, half-pint or pint jars, lids |
| Processing temp/pressure | 160–180°F oil bath | 100 minutes at 10–11 psi |
| Storage location | Refrigerator only | Pantry (room temperature) |
| Shelf life | 1 to 2 weeks | Up to 1 year for best quality |
The refrigerated method is fast, but it's short-term. Pressure canning takes longer, but it gives you shelf-stable tuna. Once it's preserved, storage and spoilage checks matter just as much as the method itself.
Storage, Shelf Life, and Food Safety
Refrigerate all tuna in oil unless it was properly pressure-canned. The storage rules come straight from the method you used.
How Long Each Method Lasts
Shelf life depends on how you preserved the tuna.
| Method | Where to Store | Shelf Life | Key Condition |
|---|---|---|---|
| Homemade tuna in oil, not pressure-canned | Refrigerator at ≤40°F in a sealed container | 1–2 weeks | Keep submerged; use clean utensils |
| Properly pressure-canned tuna in oil | Cool, dark pantry | Best quality within about 1 year | Seal must stay intact |
For the refrigerated version, use it on the earlier side if you can, especially if you packed it with aromatics or opened the jar often.
Once the storage window has passed, check the tuna before each use.
Signs of Spoilage and Botulism Risk
Discard it without tasting if you notice any of these signs:
- Off odor
- Unexpected bubbling when opened
- Swollen lid or broken seal
- Off color
- Slimy texture
- Visible mold
If you're unsure, throw it out.
Botulism is a serious risk here because tuna is low-acid. Oil limits oxygen, which can let Clostridium botulinum grow and produce toxin if the fish isn't kept cold or properly pressure-canned. The hard part is that botulism toxin can form without clear spoilage signs. That's why non-pressure-canned tuna stored at room temperature is not safe. The method, the temperature, and the seal are what matter here - not the oil by itself.
Serving Ideas and Key Takeaways
Simple Ways to Use Tuna Preserved in Olive Oil
Flake the tuna gently with a fork so it holds together in larger pieces. That texture works well in salads, pasta, sandwiches, and crostini.
A few pairings just make sense here. White beans, fennel, red onion, and bitter greens all go well with oil-packed tuna. One easy option is a salad with tuna, white beans, red onion, olive oil, salt, pepper, and parsley. It's simple, but it works.
Go easy on extra flavors. The tuna and olive oil should stay front and center.
You can also use leftover refrigerated oil in dressings, marinades, or spooned over vegetables. If the tuna was used in a refrigerated dish, treat that oil as perishable and use it soon.
Conclusion: Good Process, Good Oil, Better Results
Once it's preserved, tuna doesn't need much: fish, oil, and a few sharp ingredients.
The method you use shapes the flavor, texture, shelf life, and safety. Start with fresh tuna, cook it safely, and pack it in good extra virgin olive oil so the oil becomes part of the final dish. Use pressure canning for shelf-stable tuna. Stick to conservative storage timelines, and throw out any jar that looks off, smells off, or doesn't seal right. Fresh tuna, good olive oil, and proper storage make all the difference.
FAQs
Can I use a water-bath canner for tuna in olive oil?
No. A water-bath canner isn't recommended for tuna in olive oil. The oil can slow heat from moving through the jar, interfere with a proper seal, and create the kind of low-oxygen setting where bacteria can grow, including the bacteria linked to botulism.
For safety, keep oil-packed tuna in the refrigerator and eat it within a few days instead of trying to process it in a water-bath canner.
How do I adjust pressure canning for high altitude?
Above 1,000 feet, add 1 extra minute of boiling time for each additional 1,000 feet when sterilizing jars.
However, for vegetables preserved in olive oil, do not use water-bath or pressure canning. Oil can block heat from moving through the jar and can help bacteria grow. Instead, refrigerate at 41°F or below.
What should I do if the tuna is not fully covered in oil?
Add more olive oil until the tuna is fully covered. Any part left exposed to air can spoil more easily, so keep it under at least 1/2 inch of oil.
Use a clean utensil to press the tuna down and release any trapped air bubbles. As the jars sit in storage, check them from time to time and make sure the tuna stays completely submerged.