

Japanese Salt Pickles: Guide and Uses
If you want crisp Japanese salt pickles at home, start with 2% to 3% salt by weight, keep them cold, and taste early. That one rule gets you most of the way there.
I’d sum up the whole guide like this:
- Shiozuke means salting vegetables so they release water and make their own brine.
- Asazuke is the short version: often 30 minutes to a few hours.
- A digital scale matters because salt measured by spoons can vary.
- 2.5% salt is a safe starting point for most batches.
- Cucumbers, napa cabbage, leafy greens, turnips, daikon, carrots, and eggplant all work, but each one needs its own timing.
- Low-salt batches are not shelf-stable. Store them in the fridge at 40°F (4°C) or below and use them in 2 to 4 days.
- If they taste too salty, rinse briefly. If they taste bland, give them more time.
- Serve them drained, with rice or grain bowls, and add EVOO only at the end, not during pickling.
This guide is about getting the salt level, timing, texture, storage, and serving right - without overthinking it.
Quick Comparison
| Style | Salt level | Time | Texture | Best for |
|---|---|---|---|---|
| Asazuke | ~2% to 5% | 30 minutes to a few hours | Crisp, close to raw | Same-day side dishes |
| Longer shiozuke | ~2% to 10% | 6 to 12 hours or more | More compressed, more seasoned | Make-ahead pickles |
One more key point: these pickles are usually salt-cured, not fermented. In most home fridge batches, the salt changes the texture and flavor long before fermentation becomes the main event.
How to Make Tsukemono - Shiozuke (Salt Pickling) (Recipe) 漬物 -- 塩漬けの作り方
sbb-itb-4066b8e
How Japanese Salt Pickles Work: Salt Levels, Pressure, and Timing
In shiozuke, salt percentage and time shape the texture. Salt level, cut size, and resting time work together to pull out water, and that water loss is what changes raw vegetables into crisp, lightly pickled ones.
A digital kitchen scale is a better tool than measuring spoons because salt crystals don't all have the same size or density.
How to Calculate Salt by Weight
Weigh your vegetables after trimming and cutting, but before salting. Then multiply that weight by the salt percentage written as a decimal.
Salt in grams = vegetable weight in grams × salt percentage as a decimal
Here’s what that looks like in practice:
- For 500 g of cabbage, use 10 g salt at 2%, 12.5 g at 2.5%, or 15 g at 3%.
- For 300 g cucumber, use 6 g, 7.5 g, or 9 g.
If you're unsure where to begin, 2.5% is a good starting point. It gives you a balanced result without pushing too far in either direction. Use 2% for thin, delicate cuts when you want a mild, fresh taste. Move up to 3% for denser vegetables or when you want a saltier, more savory pickle.
After that, cut size and water content determine how fast the vegetables firm up.
What Affects the Final Texture
Thin cucumber slices can be ready in about 30 minutes. Leafy vegetables or cabbage often take 2 to 12 hours. Thick daikon, turnip, and other dense root vegetables may need 8 to 24 hours in the refrigerator.
Use moderate pressure so the vegetables stay in contact with the brine, but don't get crushed. For quick shiozuke, refrigerate while they pickle. That helps slow softening and cuts the risk of spoilage while the salt does its job.
Salt Percentage and Outcome: Comparison Table
Use these ranges as starting points, then adjust based on thickness and moisture.
| Salt percentage | Approximate timing | Expected texture | Flavor intensity | Best use |
|---|---|---|---|---|
| 2% | 30 minutes–4 hours | Fresh, crisp, lightly softened | Mild | Thin cucumber, leafy greens, quick side dishes |
| 2.5% | 2–12 hours | Pickled but still fairly crisp | Moderate and balanced | General-purpose asazuke and mixed vegetables |
| 3% | 8–24 hours | More yielding, especially with dense vegetables | More assertive and savory | Daikon, cabbage, thicker cuts, overnight pickles |
For quick shiozuke, stick to the 2%–3% range. Higher salt levels fit longer preservation methods. Next comes matching these salt levels to vegetables that pickle fast and those that need more time.
Best Vegetables for Shiozuke and What to Expect
Japanese Salt Pickles: Vegetable Guide by Salt, Time & Texture
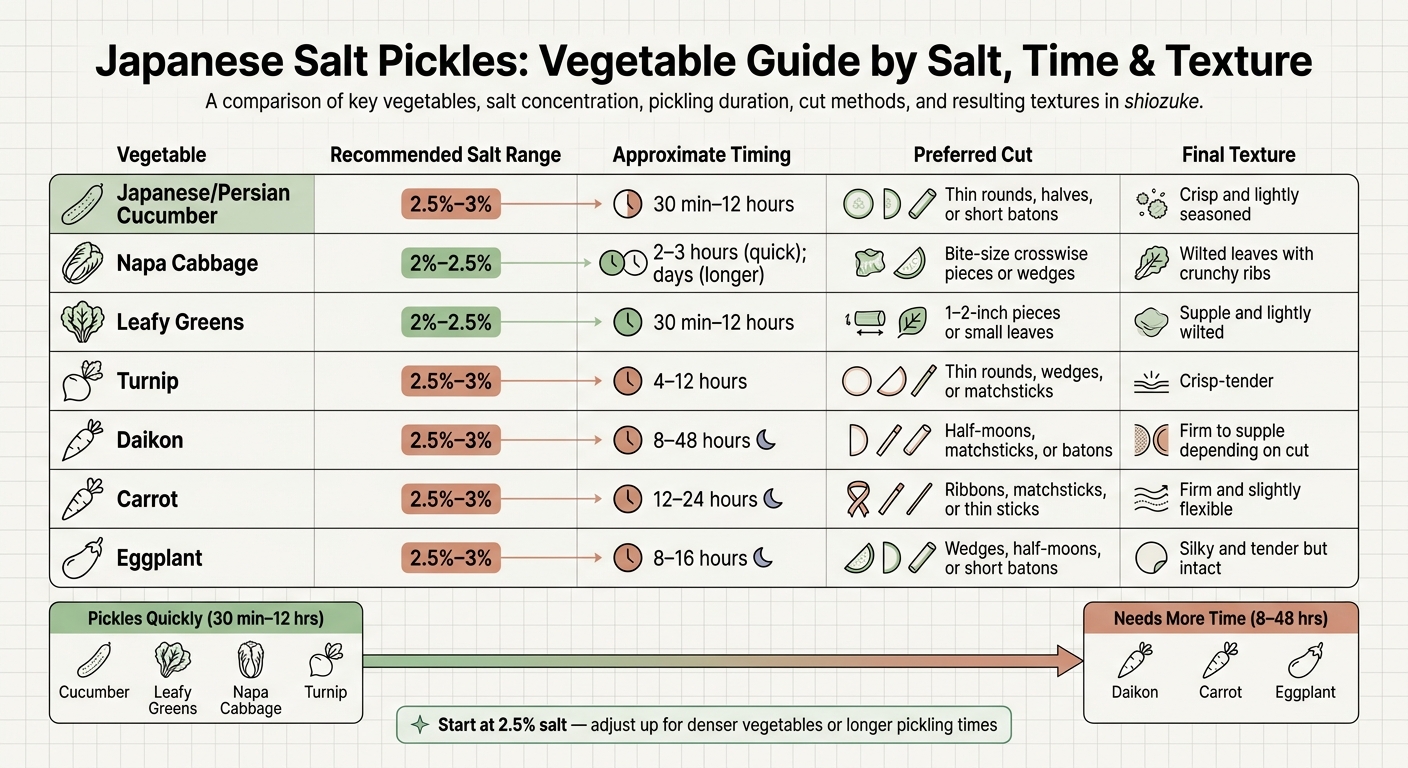
Once you know the salt range, the vegetable you choose will tell you how long to wait. The main things that change the timing are water content, density, and cut size. This guide matches each vegetable with a good cut, salt range, and rest time.
Vegetables That Pickle Quickly
Japanese or Persian cucumbers are the easiest place to start. They have thin skin and lots of water, so the salt moves through them fast. If you slice them into ⅛-inch rounds, they can be ready in as little as 30 minutes to 2 hours with 2.5%–3% salt by weight. Halved cucumbers or thicker pieces usually need 4–12 hours. Pull them when they still feel crisp and lightly seasoned. If you press them too long, they go limp.
Napa cabbage gives off a lot of liquid once salted. Cut it crosswise into bite-size pieces, use 2%–2.5% salt by weight, massage the salt into the leaves, and refrigerate it under light pressure for 2–3 hours. The leaves soften and wilt, while the thicker white ribs stay crunchy. If you want a longer pressed version, that uses more salt and takes days instead of hours.
Tender leafy greens like mizuna, mustard greens, and spinach need a light hand. Cut them into 1–2-inch pieces, use about 2%–2.5% salt, and start tasting after 30 minutes. Tougher greens can need up to 12 hours, but delicate leaves can get mushy in a hurry. Drain them as soon as they feel supple and fresh, not soggy.
Turnips pickle faster than most root vegetables. Thin rounds or wedges with 2.5%–3% salt are often ready in 4–12 hours.
Vegetables That Need More Time
Daikon, carrots, and eggplant take longer. They’re denser, so it takes more time for the seasoning to move inward.
Daikon works well cut into thin half-moons or matchsticks. Expect 8–24 hours at 2.5%–3% salt. If you cut it into thick batons, the wait can stretch to 48 hours. Carrots hold their shape even longer. Matchsticks or thin ribbons at 2.5%–3% salt often need 12–24 hours before the center tastes seasoned. Eggplant is a little different. Its porous flesh takes in salt fast, but too much pressure or too much time can make it collapse. For small wedges or half-moons at 2.5%–3% salt, start checking after 8 hours.
The table below sums up the most useful cut-and-time ranges.
Vegetable Guide: Comparison Table
Times vary with cut size, freshness, and pressure.
| Vegetable | Recommended salt range | Approximate timing | Preferred cut | Final texture |
|---|---|---|---|---|
| Japanese or Persian cucumber | 2.5%–3% | 30 minutes–12 hours | Thin rounds, halves, or short batons | Crisp and lightly seasoned |
| Napa cabbage | 2%–2.5% (quick); more for longer pressing | 2–3 hours (quick); days (longer) | Bite-size crosswise pieces or wedges | Wilted leaves with crunchy ribs |
| Leafy greens | 2%–2.5% | 30 minutes–12 hours | 1–2-inch pieces or small leaves | Supple and lightly wilted |
| Turnip | 2.5%–3% | 4–12 hours | Thin rounds, wedges, or matchsticks | Crisp-tender |
| Daikon | 2.5%–3% | 8–48 hours | Half-moons, matchsticks, or batons | Firm to supple depending on cut |
| Carrot | 2.5%–3% | 12–24 hours | Ribbons, matchsticks, or thin sticks | Firm and slightly flexible |
| Eggplant | 2.5%–3% | 8–16 hours | Wedges, half-moons, or short batons | Silky and tender but intact |
Taste the thickest piece. If the center still seems bland, either cut the vegetables smaller or give them more time with the salt.
How to Make Japanese Salt Pickles at Home
Step-by-Step Method
Once you've picked your salt level and cut style, the process is pretty simple. Salt the vegetables by percentage, then let pressure and time change the texture. Weigh the trimmed vegetables, then calculate the salt like this: vegetable grams × salt percentage = salt grams. A scale matters here, since spoon measurements can swing a lot depending on the type of salt.
Cut the vegetables into even pieces - thin rounds, matchsticks, or similar strips - so they pickle at the same pace. Add the salt in stages, toss, and gently massage until everything is coated. For leafy vegetables, a short massage helps pull out moisture. You can add kombu, ginger, chili flakes, or citrus peel if you want, but keep it light so the vegetables stay front and center.
Pack the salted vegetables into a clean glass or food-safe container. Set a flat plate on top, then add a moderate weight, like a small jar, a food-safe bag partly filled with water, or a pickle press. Press down firmly and evenly, but don't crush the vegetables. Then let the fridge do its job. Start tasting after about 1 hour, and keep checking from there. Thin slices or leafy greens can be ready fast, while thicker cuts of daikon or carrot may need a few hours or overnight.
Food safety note: Low-salt refrigerator pickles made at 2%–3% salt are not shelf-stable. Keep them covered in the refrigerator, use clean utensils each time you serve them, and discard any batch with mold, off odors, or unusual discoloration.
When to Drain, Rinse, or Keep Pickling
Go by taste, not by the clock. When the flavor and texture feel right, lift the vegetables out and let them drain. For a lightly salted batch, that's often enough. No rinse needed. If the vegetables seem very wet, gently squeeze small portions before serving. Just don't wring delicate greens or cabbage, or they can turn mushy.
If the batch tastes too salty, give it a brief rinse under cold water, drain it well, and taste again. A short cold-water soak can pull out more salt, but it will also soften the texture. If the vegetables still taste flat or feel too firm, put the weight back on and refrigerate a bit longer before checking again.
Troubleshooting Common Problems: Comparison Table
If something feels off, the issue is usually one of four things: salt, cut size, pressure, or time.
| Problem | Likely cause | Direct correction |
|---|---|---|
| Too salty | Excess salt, prolonged pickling, or pieces cut too small | Briefly rinse, drain, gently squeeze, and serve with plain rice or unsalted grains |
| Too soft | Overly thin cuts, excessive pressure, warm storage, or excessive pickling time | Use thicker cuts, reduce pressure, refrigerate promptly, and stop the process earlier |
| Too much liquid | High-water vegetables, prolonged pressing, or natural moisture release | Drain before serving; do not add more salt unless the flavor is genuinely bland |
| Bland flavor | Insufficient salt distribution, inadequate time, or large uneven pieces | Toss more thoroughly, use a measured salt percentage, cut pieces uniformly, and refrigerate longer |
| Uneven seasoning | Uneven cuts or salt added by volume | Recut future batches uniformly and weigh both vegetables and salt; redistribute the current batch gently |
| Not enough crunch | Soft vegetable, excessive handling, or excessive pickling time | Use very fresh produce, apply moderate pressure, and taste earlier in the process |
After that, serving is mostly about draining well, pairing the pickles with the rest of the meal, and catching them at the texture you like best.
Serving, Storage, and Key Takeaways
How to Serve Them with Rice, Grains, and EVOO
Once the pickles hit the texture you like, think less about preserving and more about how they fit on the plate. Japanese salt pickles work best as a small, salty accent. You can serve them next to rice, spoon them over a grain bowl, or mix them right into the food.
Drain them first. That keeps the texture crisp and stops extra brine from watering everything down. Finely chopped cucumber or daikon pickles are great folded into warm steamed rice, and they also work well as a filling for onigiri. If you're building a grain bowl, add about 2 to 4 tablespoons of drained pickles over brown rice, barley, farro, or quinoa, then pair them with tofu, grilled fish, or roasted vegetables. Since the pickles already bring plenty of salt, go easy on soy sauce, miso, or salted fish.
For a richer finish, add EVOO only after draining. EVOO belongs at the end, not during pickling. About ½ to 1 teaspoon per serving is enough to add a soft, fruity note without covering up the clean, salty taste of the vegetables. A small drizzle of Big Horn Olive Oil Ultra Premium EVOO adds fruitiness without masking the pickles.
Light Vinegar Dressings and Pairing Table
A light rice-vinegar dressing can wake the pickles up a bit without making them harsh or too acidic. For about 2 cups of drained pickles, start with 1 to 2 teaspoons of unseasoned rice vinegar mixed with 1 teaspoon of water. If you want a little more flavor, you can add a bit of grated ginger, toasted sesame, or citrus zest. Taste first, though. Most of the time, the pickles already have enough salt. Keep the dressing light so they stay crisp.
Use these pairings to line up the pickle style with the rest of the meal.
| Pickle style | Best pairing | EVOO use | Light dressing idea |
|---|---|---|---|
| Cucumber asazuke | Quinoa with tofu and herbs | Mild EVOO after draining | Rice vinegar, water, and grated ginger |
| Cabbage shiozuke | Brown rice or barley with roasted vegetables | Fruity EVOO over the finished bowl | Rice vinegar with a little citrus zest |
| Daikon shiozuke | Farro with mushrooms or edamame | Small drizzle over sliced daikon | Rice vinegar and grated ginger |
| Turnip pickle | Short-grain rice with tofu | Mild EVOO just before serving | Rice vinegar diluted with water |
| Mixed vegetable asazuke | Plain steamed rice or quinoa bowl | EVOO as a final accent | Light vinegar dressing served on the side |
Storage, Texture Control, and Final Points
Store drained pickles in a clean, airtight container and refrigerate them right away. Keep them at or below 40°F (4°C). Use clean utensils each time you serve them, and put the container back in the fridge as soon as you're done. Lightly salted asazuke is meant to be eaten soon, so keep it chilled and use it within 2–4 days, depending on the salt level, moisture, and how it was made. Toss any batch that shows mold, sliminess, or an off smell.
High-moisture vegetables like cucumber and napa cabbage let out liquid fast. Draining extra brine before storage helps slow down softening. If the pickles come out too salty, give them a quick rinse, drain well, and serve.
FAQs
What salt works best?
Use non-iodized salt for the best results, like sea salt, canning salt, or pickling salt. Skip iodized table salt. It can make the brine cloudy and change the flavor.
The right salt keeps the process clean and steady, and it helps the vegetables stay crisp.
Can I make shiozuke without a weight?
Yes, but using a weight is strongly recommended.
It keeps the vegetables fully submerged in the brine. And that matters, because vegetables that stick above the surface are more likely to spoil or develop off flavors.
No food-safe weight on hand? You can use:
- A small plate
- A sealed water bag
The main goal is simple: keep the vegetables under the brine. That’s a standard step for both safety and quality.
How do I know when the pickles are done?
For quick vinegar pickles, let them sit in the fridge for at least 24 hours before serving. That wait matters. It gives the brine time to soak in, so the pickles taste sharp, salty, and balanced instead of flat.
For fermented pickles, pay attention to the signs that things are going the way they should. A pleasant tangy smell, visible bubbling, and a softer texture are all good signals. On the flip side, throw them out if you notice mold, sliminess, foul odors, or odd discoloration.
If the pickles are stored in oil and vinegar, keep them fully submerged and refrigerated at 41°F or below.