

Mediterranean Olive Curing: 7 Steps
Dry-salt curing takes about 5–6 weeks - not a weekend. I use a tested recipe to guide the salt amount, curing conditions, and storage. One UC method calls for 1 pound of pickling salt per 2 pounds of olives, but that ratio isn’t a rule for every method.
Here’s the seven-step plan I follow:
- Sort and weigh: Keep sound, ripe olives and weigh them before adding salt.
- Wash and drain: Rinse with drinking water and let standing water drain away.
- Check before cutting: Leave olives whole unless the recipe calls for slitting or cracking.
- Salt and cover: Measure salt by weight, allow drainage, and cover loosely.
- Turn and inspect: Follow the recipe’s schedule and discard spoiled batches without tasting.
- Test and finish: Taste only after inspection, then remove salt as directed.
- Refrigerate and label: Store at 40°F or below and follow the recipe’s storage limit.
My rule: <u>follow the recipe, not just the calendar</u>. Wrinkling is expected; mold, slime, and rotten odors aren’t. Any olive oil, raw garlic, or herbs go only into the portion I’m serving - not the stored batch.
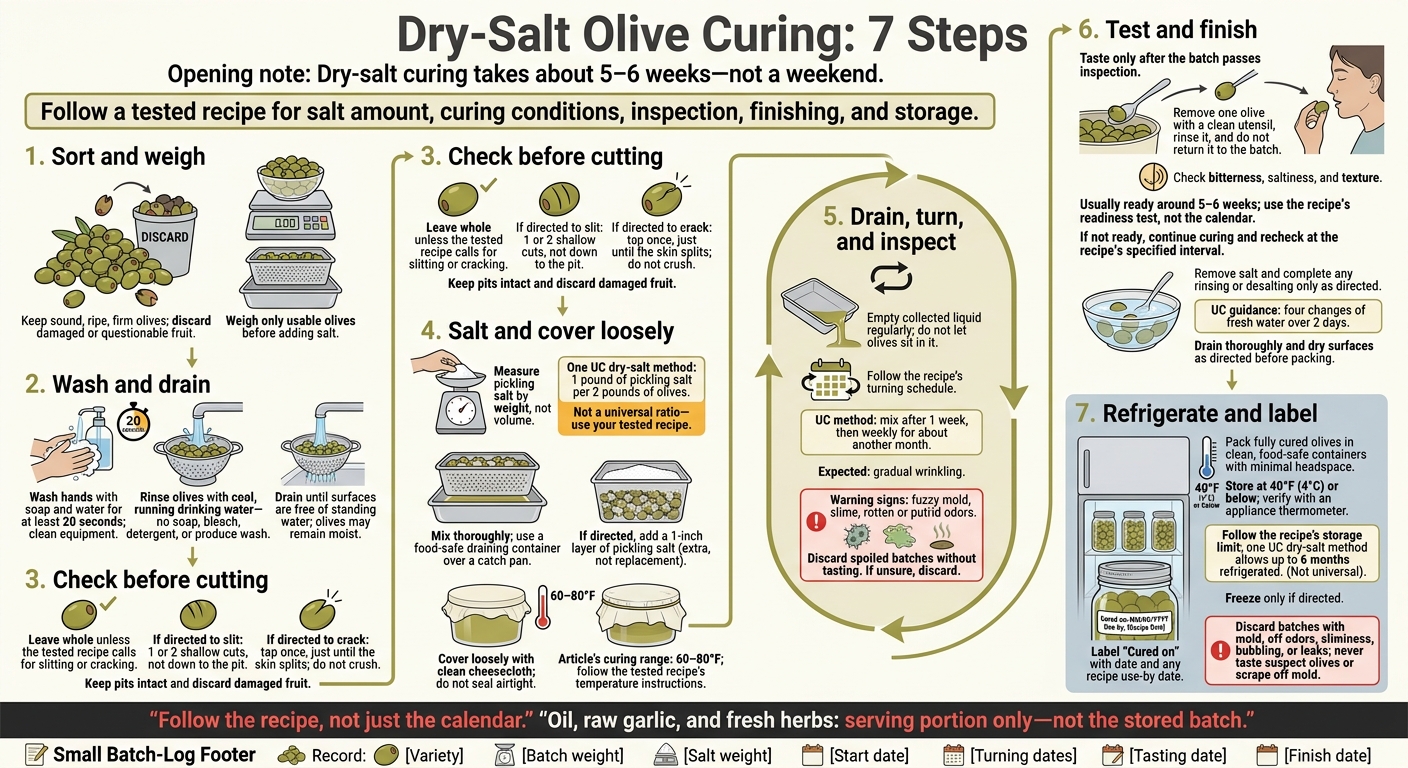
Dry-Salt Olive Curing: 7 Steps
How To Dry Cure Olives In 3 Weeks / Dry Salt-Cured Olives Recipe/ Homemade Salt Cured Olives
sbb-itb-4066b8e
Step 1: Sort and Weigh the Olives
- [ ] Choose ripe, firm olives. Spread them on a clean surface in good lighting. Sort by size and ripeness so they cure evenly.
- [ ] Remove debris and damaged fruit. Pick out stems, leaves, and twigs. Discard olives that are split, insect-damaged, moldy, leaking, or soft. Don’t trim questionable spots to save the fruit.
- [ ] Weigh only the usable olives before salting. Record this weight - you’ll use it to determine how much curing salt to add.
- [ ] Place the draining container over the pan. Make sure liquid can drain freely.
After sorting and weighing, wash and drain the olives before cracking or slitting them.
Step 2: Wash and Drain the Olives
Start with clean hands and equipment. Wash your hands with soap and water for at least 20 seconds. Clean the sink, colander, utensils, and work surface with hot, soapy water. Rinse utensils and tools, then dry them with a clean towel or let them air-dry.
Rinse the olives under cool, running drinking water. Use plain water only - no soap, bleach, detergent, or produce wash.
Let the olives drain until no water collects in the container. Gently shake the colander once or twice to release trapped water. If needed, spread the olives in a single layer on new disposable towels.
Move the olives to the next step only when their surfaces are free of standing water. They can still be moist; don’t dry them out.
Step 3: Crack or Slit Only as Directed
After draining, check your recipe to see whether the olives should stay whole, be slit, or be cracked. Some dry-salt methods leave ripe black olives whole, so don’t cut them unless directed.
- To slit: Make 1 or 2 shallow cuts through the skin and just into the flesh. Don’t cut down to the pit.
- To crack: Tap each olive once with a clean mallet or the flat side of a knife, just until the skin splits. Don’t crush the fruit.
Keep the pits intact. Discard olives with broken pits, crushed flesh, heavy bruising, or leaking juice. Damaged fruit cures unevenly.
Label each batch with the date and method used - whole, slit, or cracked. Follow that recipe’s salt amount, inspection schedule, and tasting time.
In the next step, add the salt evenly to the prepared olives.
Step 4: Add Salt and Cover Loosely
Salt draws moisture and bitterness out of the olives.
- Weigh the pickling salt and olives. Use the amount in your tested recipe. A common starting ratio is 1 pound of pickling salt for every 2 pounds of olives. Measure by weight, not volume.
- Mix and transfer. Toss the olives thoroughly with the salt. Move them to a clean, food-safe draining container set over a catch pan.
- Add surface salt only if your recipe calls for it. If instructed, spread a 1-inch layer of pickling salt over the olives. This is extra salt - not a replacement for the measured amount.
- Cover loosely with clean cheesecloth. It keeps dust and insects out while allowing airflow. Don’t seal the olives airtight during curing.
- Keep the batch at 60–80°F, away from direct sun and heat. Follow your tested recipe’s temperature instructions, and don’t reduce the salt - it preserves the olives.
As liquid collects, drain it and turn the olives in Step 5.
Step 5: Drain, Turn, and Inspect
As the olives release liquid, drain them regularly and turn them on schedule. This helps the salt work evenly and lets you catch signs of spoilage early.
- [ ] Keep the draining container above the catch pan. Empty the pan regularly so the olives don’t sit in the liquid they release.
- [ ] Turn the olives on your recipe’s schedule. The University of California method calls for mixing after 1 week, then weekly for about another month. Mix the olives and salt, then put them back in the draining container. Record each inspection date so you don’t miss a check.
- [ ] Inspect before covering again. Gradual shriveling is expected. Fuzzy mold, a slimy texture, and rotten odors are not. Cover again with clean cheesecloth, not plastic wrap.
- [ ] Discard spoiled batches without tasting. If you find extensive mold, rotten or putrid odors, or a slimy texture, discard the whole batch. Don’t try to save it by rinsing or removing only the visibly affected olives. For other changes, follow your tested recipe’s guidance. If you’re unsure, discard the batch.
Stick to the recipe’s schedule. When the olives are evenly wrinkled and draining slows, move to Step 6.
Step 6: Taste and Finish Curing
After draining and turning, taste one olive to check whether the batch is ready. Taste only after the batch passes inspection.
Use a clean utensil to remove one olive, rinse it under cool running water, and don't return it to the batch. If your recipe calls for more desalting, follow its soaking or water-change instructions.
Check the olive’s bitterness, saltiness, and texture. Expect a salty, somewhat shriveled olive with concentrated flavor and a firm, chewy texture. Dry salting may leave some bitterness because it removes less oleuropein than several water- or brine-curing methods. Olives are usually ready around 5–6 weeks, but use the recipe’s readiness test - not the calendar.
If the sample still tastes too bitter or harsh, keep the remaining olives in the cure. Recheck at the interval your recipe specifies, using a newly removed, rinsed sample each time.
Once the olives reach the recipe’s endpoint, brush off loose salt, rinse them, and follow any directions for water changes. University of California guidance specifies four changes of fresh water over 2 days to remove salt before eating. Drain thoroughly, then spread the olives in a single layer on clean towels or a clean, food-safe rack until their surfaces are dry.
Step 7: Refrigerate and Label
Once the olives pass the taste check, move them into cold storage.
- Pack fully cured olives in clean, food-safe containers with minimal headspace. Remove excess salt or surface moisture only as the recipe directs. Don’t rinse or soak unless instructed.
- Label each container with “Cured on” and the date in MM/DD/YYYY format, plus any recipe use-by date. Follow the recipe’s storage limit: one UC dry-salt method allows up to 6 months refrigerated. Freeze only if directed.
- Refrigerate at 40°F (4°C) or below. Check the temperature with an appliance thermometer, and return the container to the refrigerator promptly after serving.
- Before refrigeration and throughout storage, discard any batch with mold, off odors, sliminess, bubbling, or leaks. Never taste a suspect batch, scrape off mold, or cover spoilage with oil.
Optional Olive Oil Finish Before Serving
If desired, toss only the portion you’re serving with a little Ultra Premium Extra Virgin Olive Oil from Big Horn Olive Oil.
Don’t store the whole batch in oil. Use oil only for the serving portion, and add raw garlic or fresh herbs only to that portion.
Conclusion: Review the 7 Steps
After curing, check that you followed the full sequence: sort sound, mature olives; wash and drain; crack or slit only as directed; add measured salt; drain and turn on schedule; taste to finish; refrigerate according to the tested recipe.
Weigh the salt - don’t measure it by volume. One UC dry-salt method calls for about 1 pound of pickling salt for every 2 pounds of olives. Don’t guess the salt amount, seal the olives airtight, or leave them sitting in collected liquid.
Before storing the batch, record the variety, batch weight, salt weight, start date, turning dates, tasting date, and finish date in a batch log.
FAQs
Which olive varieties work best for dry-salt curing?
For dry-salt curing, choose riper, softer olives instead of firmer green ones. Throumpa (or Throuba) is the gold standard, prized for its concentrated, sweet-nutty, earthy flavor. Ripe Amfissa olives also work well for a softer, more concentrated dry-salt style.
Whatever variety you choose, pick healthy olives of uniform size with no bruises or insect damage.
Can I use kosher salt instead of pickling salt?
Yes, you can use kosher salt to cure olives. Choose non-iodized salt: iodized salt can cloud the brine and affect flavor and fermentation.
Measure salt by weight, not volume, to keep the brine ratio correct. Different salts have different densities, so the same volume won’t always give you the same amount of salt.
How can I reduce saltiness without compromising safety?
Keep the brine strength unchanged during curing. Taste the olives before adjusting their saltiness. If they’re too salty, soak them in clean water - unchlorinated if possible - for 7–14 days, changing the water daily. To cut the soaking time, drain and rinse the olives, soak them overnight, then repack.
After soaking, drain the olives well and store them properly, keeping them fully submerged. Discard any olives with mold, a foul odor, or excessive softness.